In this project, I want to create a visual guide to better understand Git operations. While learning how to effectively work with Git, I realized that seeing what happens visually when running Git commands helps solidify the concepts.
Check out the following links:
- A fantastic tool for seeing Git commands in action with a visual representation: link
- A humorous and practical guide for fixing Git mistakes quickly and effectively: link
Working with Git locally
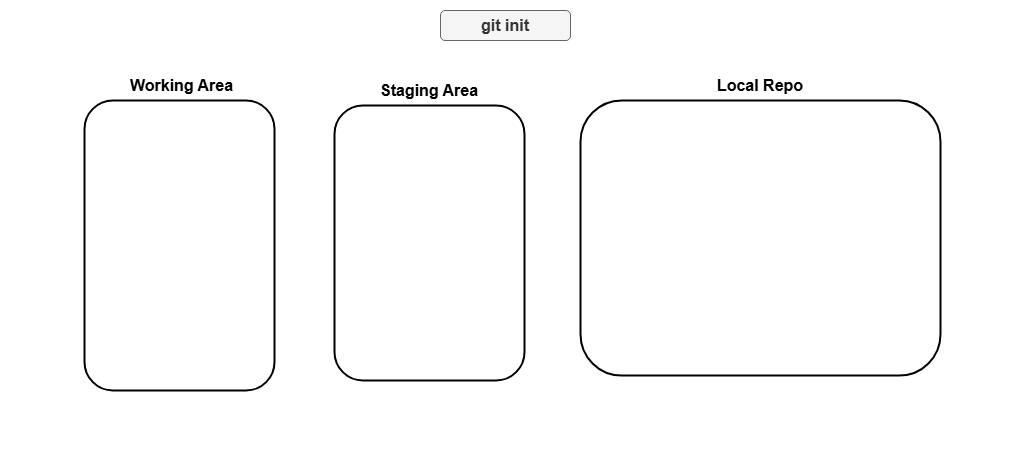
Think of this as setting the stage. When you run git init in your project’s directory, you’re creating a new Git repository.
This tells Git to start tracking changes in your files.
It’s the first step in bringing your project under version control. Now that your repository is set up, it’s time to decide what changes you want to track.
The The Staging changes is great, but to make them permanent in Git’s history, you need to commit.
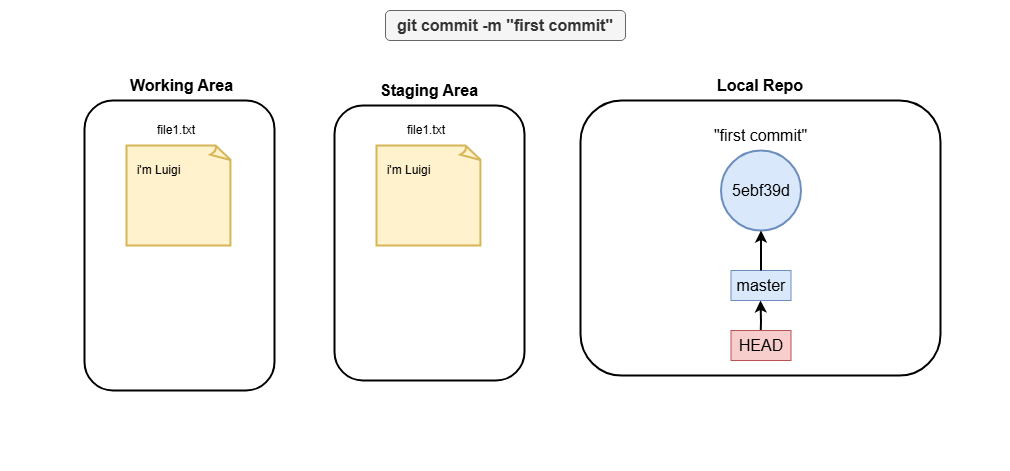
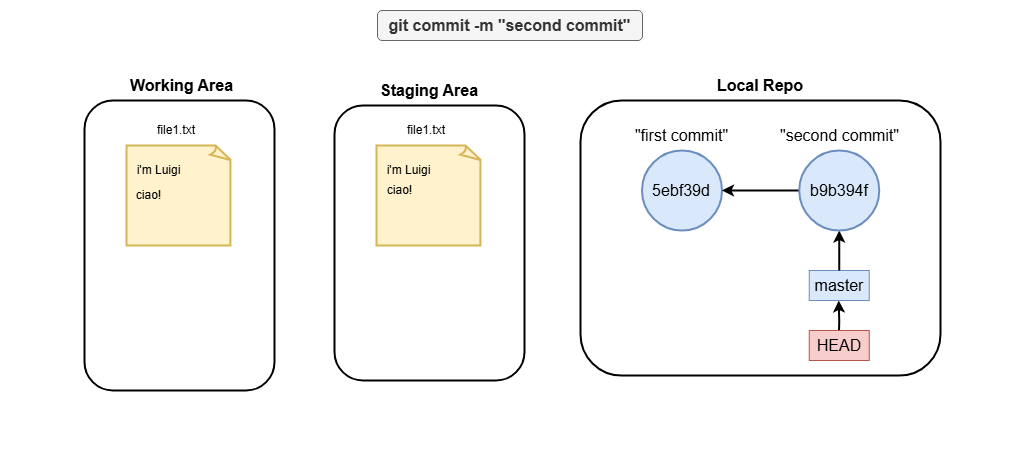
The git commit command saves a snapshot of your staged changes.
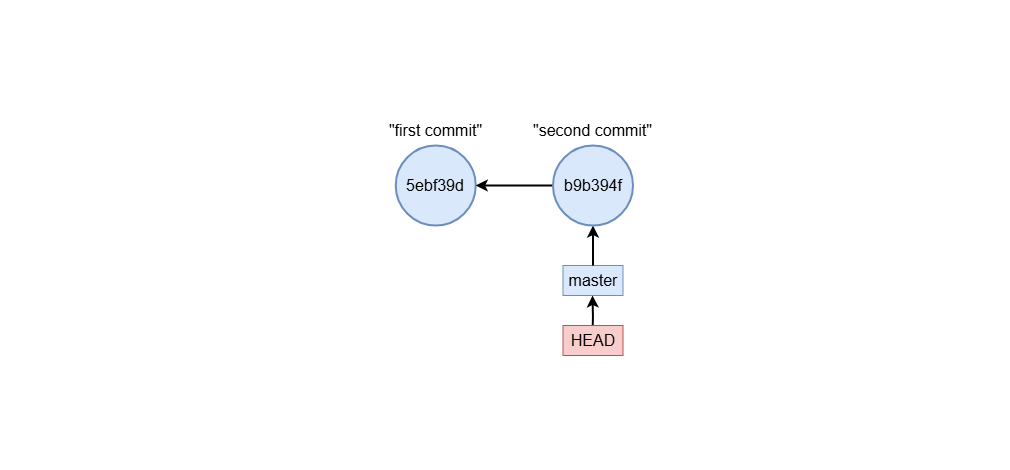
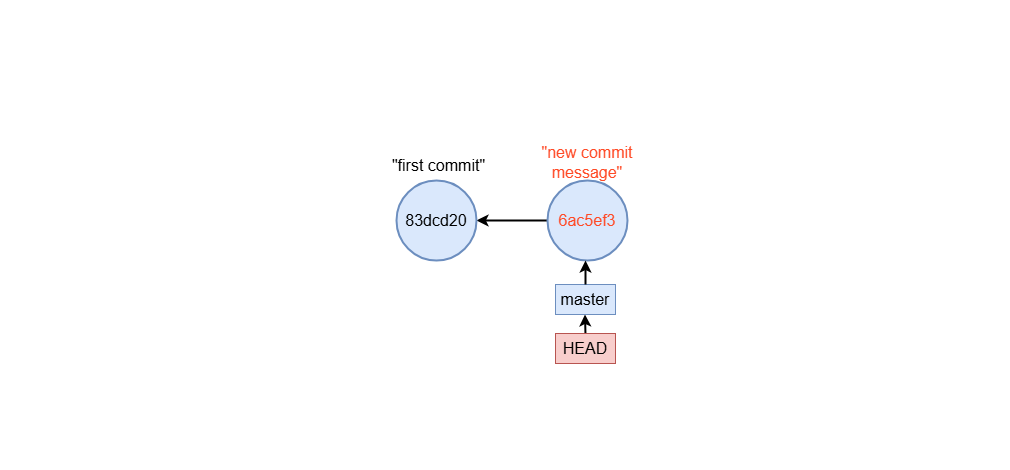
It also requires a message describing what you’ve done, like this: Below here an example on how to start a repository and what happens graphically: Master and HEAD are both references.
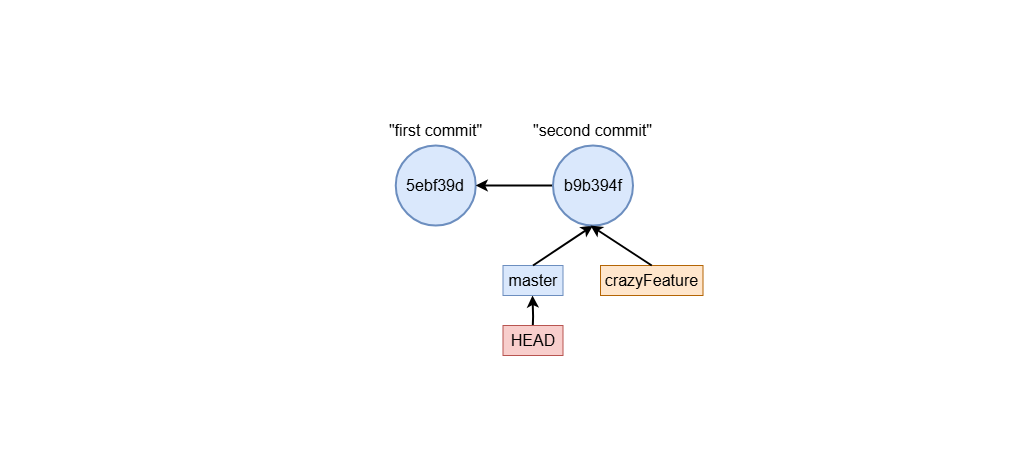
In the example above, HEAD reference always points to master branch reference.
You can run: Where you see that HEAD points to master branch reference.
In the other hand, the master reference points to the most recent commit sha.create first (and second) commit
git initgit init
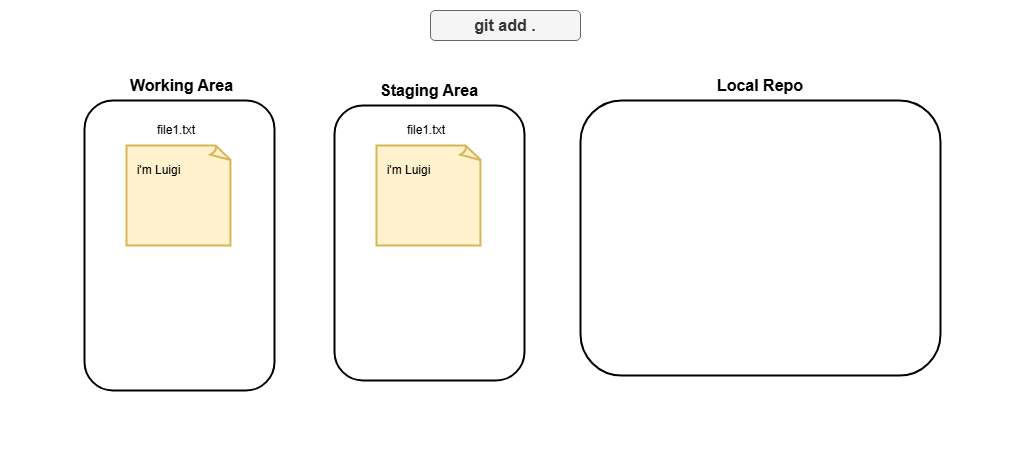
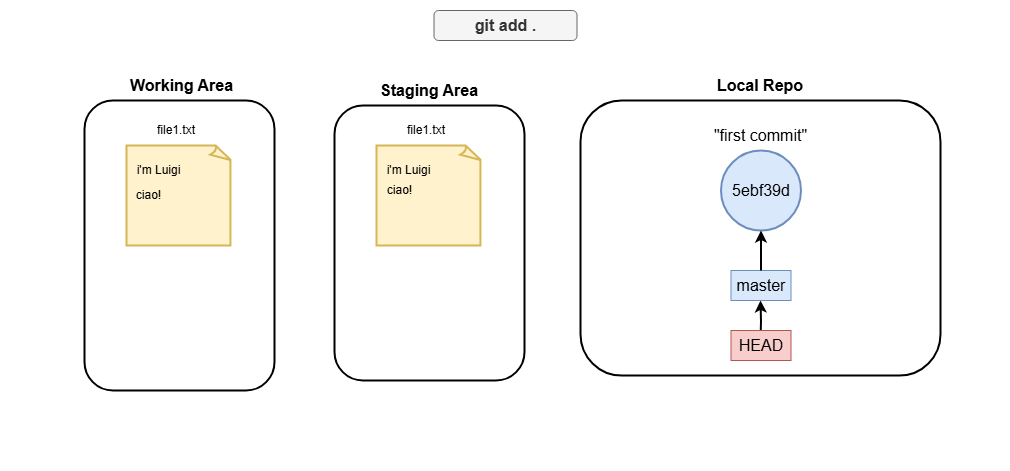
git addgit add . command stages all changes in your current directory for the next commit.
Whether you’ve created new files, updated existing ones, or deleted something, this command ensures Git knows about it.git add .
. after git add means “track every file in the repository” (expect the one specified in .gitignore).
If you only want to track specific files or directorys, you can do:git add /path/to/file
git add /path/to/dir/
git commitgit commit -m "first commit"
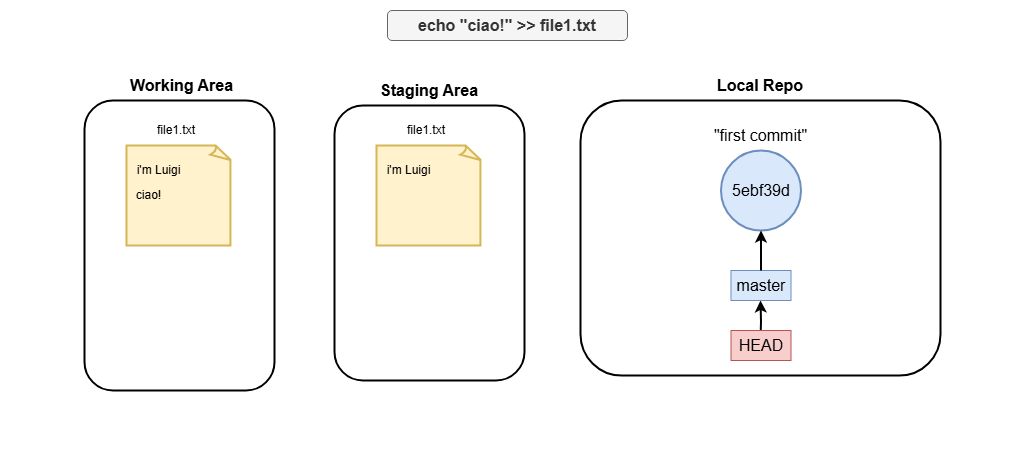
Example, create first and second commit
git init # Initialize empty git repository

# First commit
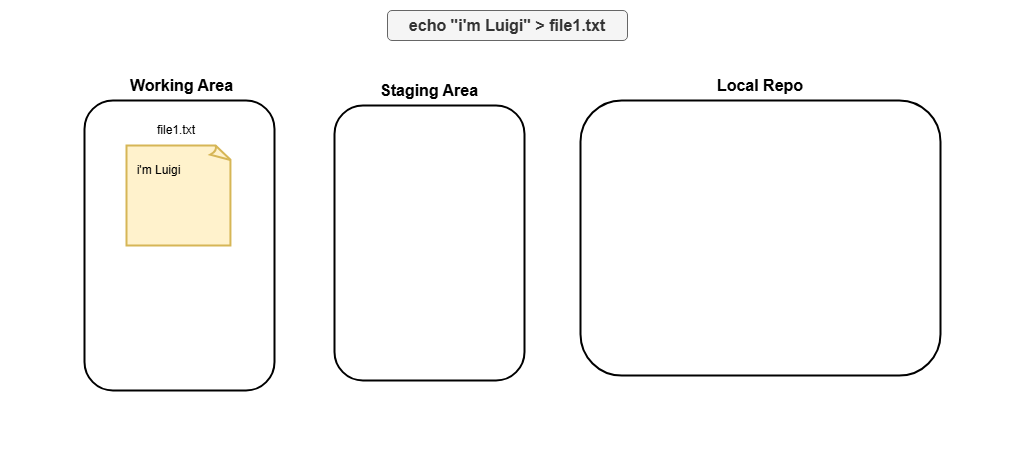
echo "i'm Luigi" > file1.txt # Create first file
git add . # Stage content
git commit -m "first commit" # Create first commit


# Second commit
echo "ciao!" >> file1.txt
git add .
git commit -m "second commit"
What is master and HEAD
$ cat .git/HEAD
ref: refs/heads/master
$ cat .git/refs/heads/master
b9b394fb13ea56880d3d49b5a87bc8a19cdb8ab2
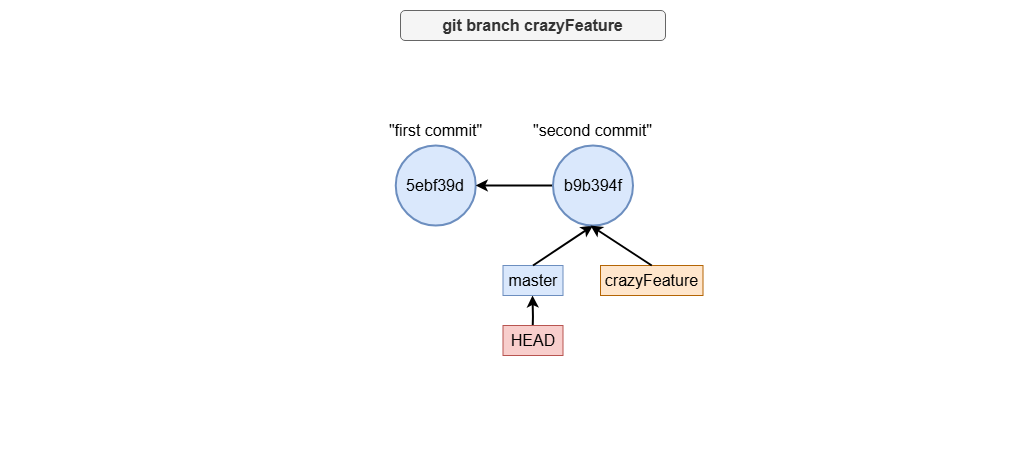
This command creates a branch named crazyFeature at the current commit, but it doesn’t switch you to the new branch immediately.
Instead, it simply adds a new pointer to your branch history. Graphically, it can be seen as follows: To delete a branch ref, simply type:git branch - create (and delete) branches
git branch crazyFeature
git branch -d crazyFeature
To make the output more compact and visually appealing, you can use the following options: Example: This view helps you understand the branching and merging structure at a glance.
git log
git log
--oneline: Displays each commit in a single line, making it easier to scan.--all: Includes all branches, not just the one your HEAD is pointing to.--graph: Displays the history in a graphical representation, showing branch relationships.--date-order: By default the ordering of commits is topological (--topo-order), to have a chronologically ordered output you have to add the --date-order flag.git log --oneline --all --graph --date-order
*   abc123 (HEAD -> master) Merge branch 'crazyFeature'
|\
| * xyz789 Added crazy feature
| * def456 Initial commit on crazyFeature branch
* 456def Third commit
* 123abc Second commit
* 789xyz Initial commit
git status
git status
git diff
Common Use Cases
git diff
git diff path/to/file
git diff commit1-sha commit2-sha
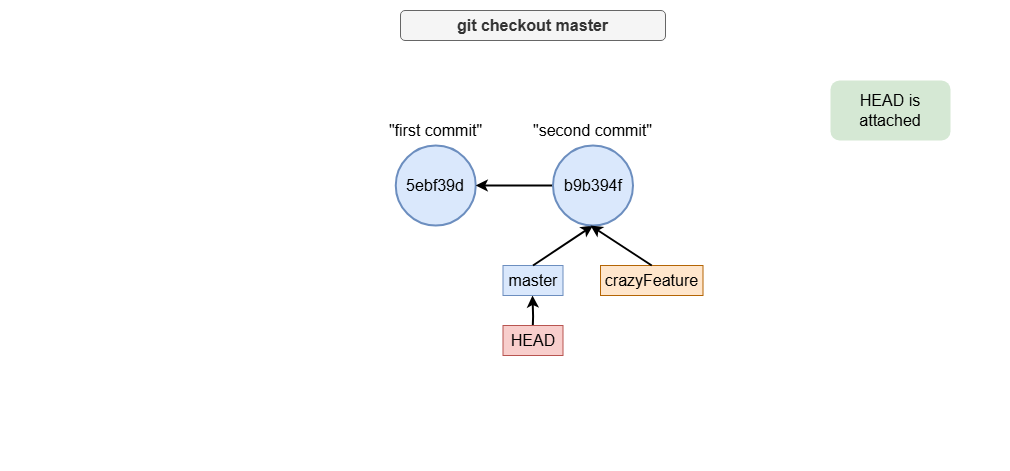
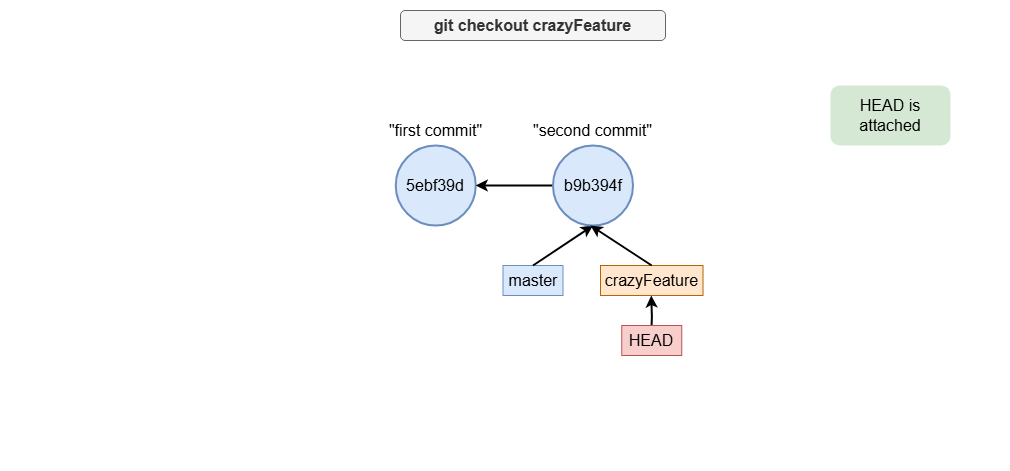
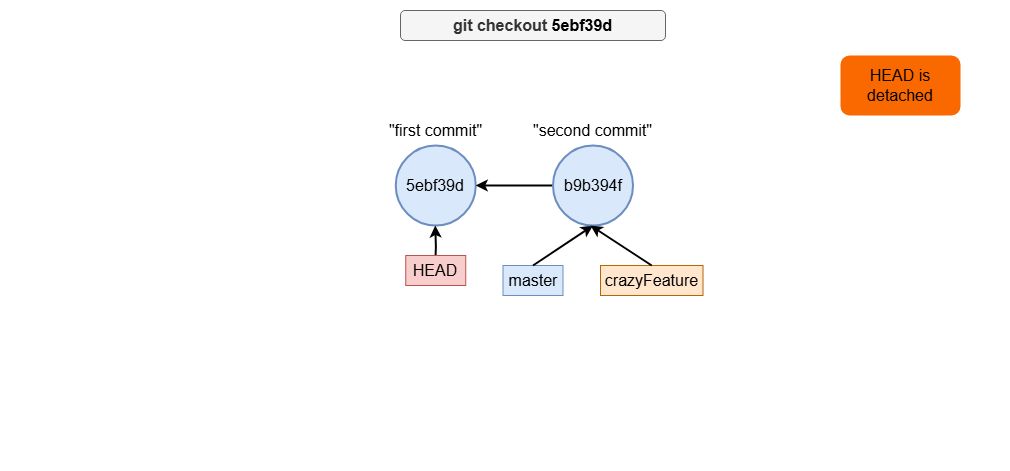
When you switch to a branch using If you check out a specific commit (e.g., by its hash), the HEAD enters a “detached” state.
In this state, you can view the repository at that commit, but any changes or commits you make won’t belong to a branch. Detached HEAD can be useful for exploring past commits or testing code from a specific point in time, but be cautious: any commits made in this state may be lost unless explicitly saved (e.g., by creating a branch). Let’s see how the following commands can be visualized:git checkout - moving HEAD around
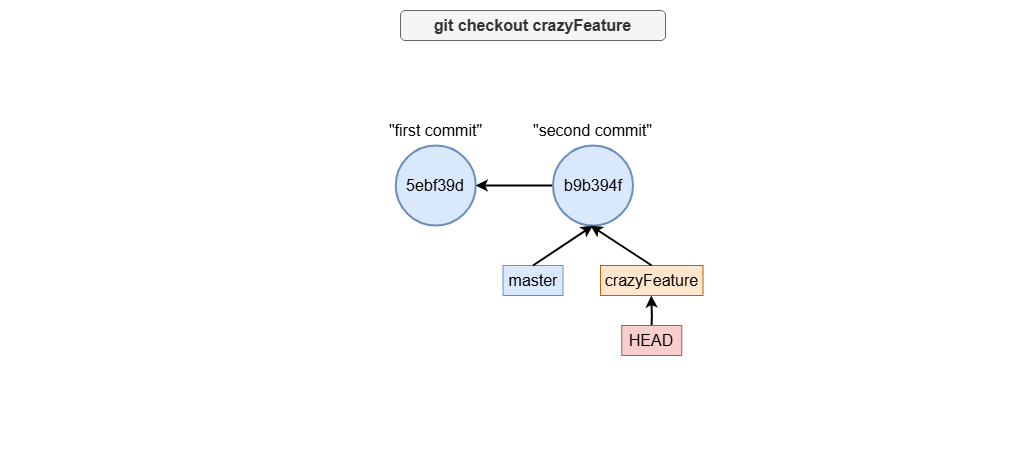
Moving HEAD to a Branch
git checkout <branch-name>, HEAD is said to be “attached” to that branch.
This means any new commits will be added to the branch.git checkout crazyFeature # Move HEAD to crazyFeature branch
git checkout master # Move HEAD to master branch
Detached HEAD state
git checkout a678ecf # Detach HEAD and view a specific commit
Visual feedback
git checkout crazyFeature # Move HEAD to crazyFeature branch
git checkout master # Move HEAD to master branch
git checkout a678ecf # Detaching HEAD
Other ways to navigate history

To start working on a branch, you use the git checkout (or git switch) command to move the HEAD pointer to the branch you want to develop. For example: Once you’re on the desired branch, you can start making changes, staging them, and committing. For example: These commands add two commits to the crazyFeature branch, each capturing a new set of changes. If you want to shift your focus back to the main branch (e.g., master) to make changes there, simply switch branches again: You can then continue committing to the master branch: Switching branches dynamically updates your working directory to reflect the state of the branch you’re on.
This ensures that your changes are isolated to the correct branch, keeping your work organized.
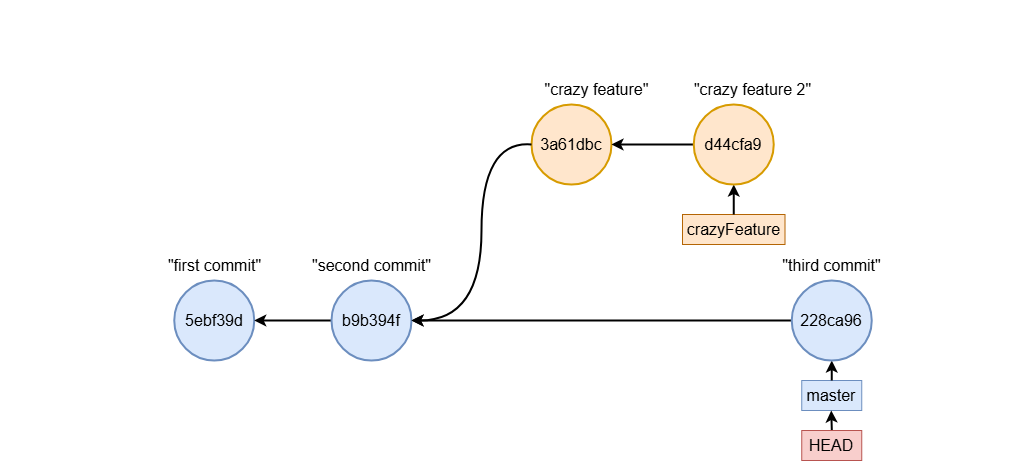
develop branch
Switching to the Branch to Develop
git checkout crazyFeature # Move HEAD pointer to the crazyFeature branch
Making Commits on the Branch
echo "crazy feature" >> file1.txt
git add .
git commit -m "crazy feature"

echo "crazy feature 2" >> file1.txt
git add .
git commit -m "crazy feature 2"
Switching Back to the Main Branch
git checkout master # Move HEAD pointer back to master
echo "third commit" >> file1.txt
git add .
git commit -m "third commit"
Visualizing Changes
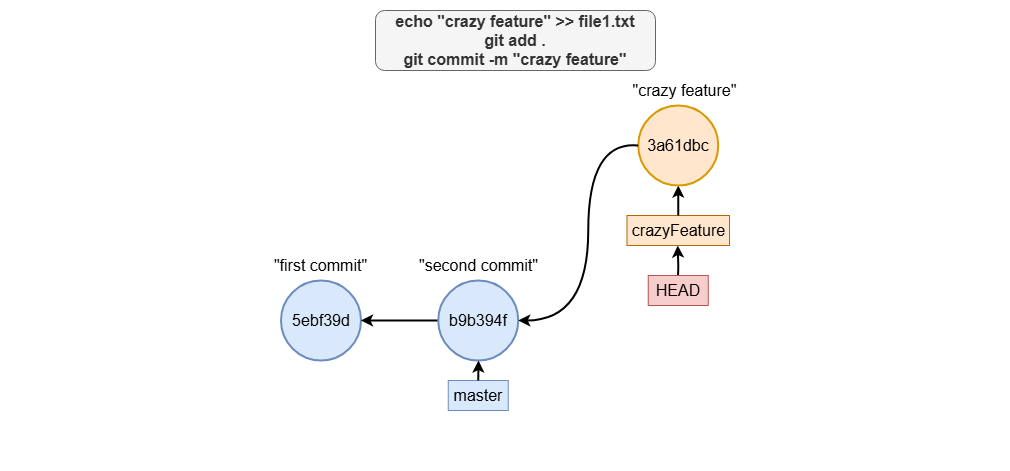
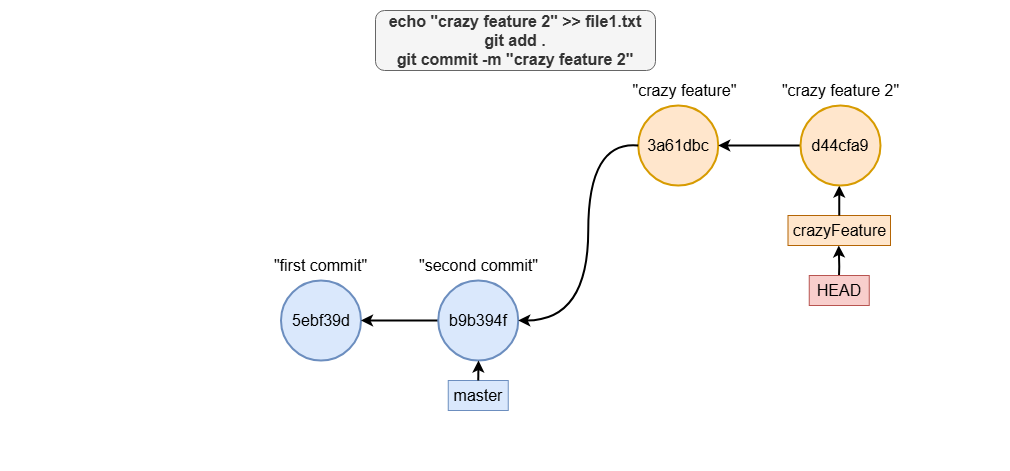
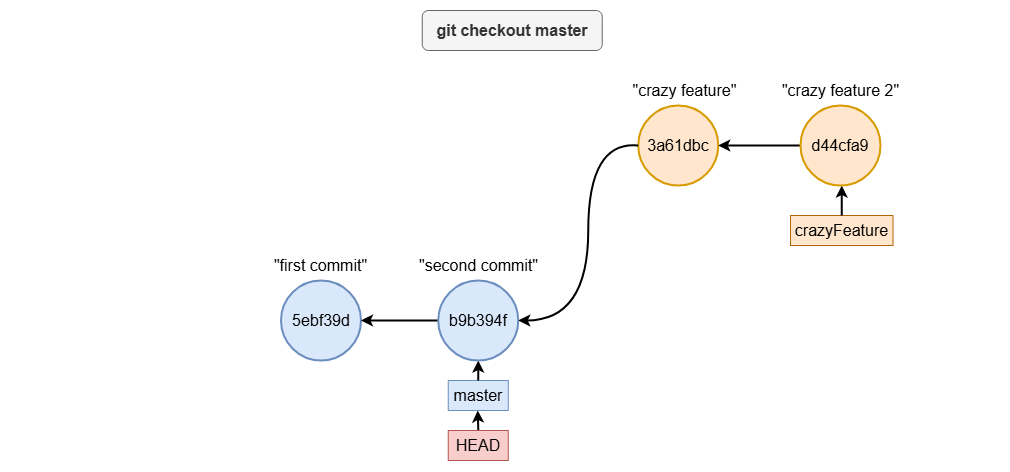
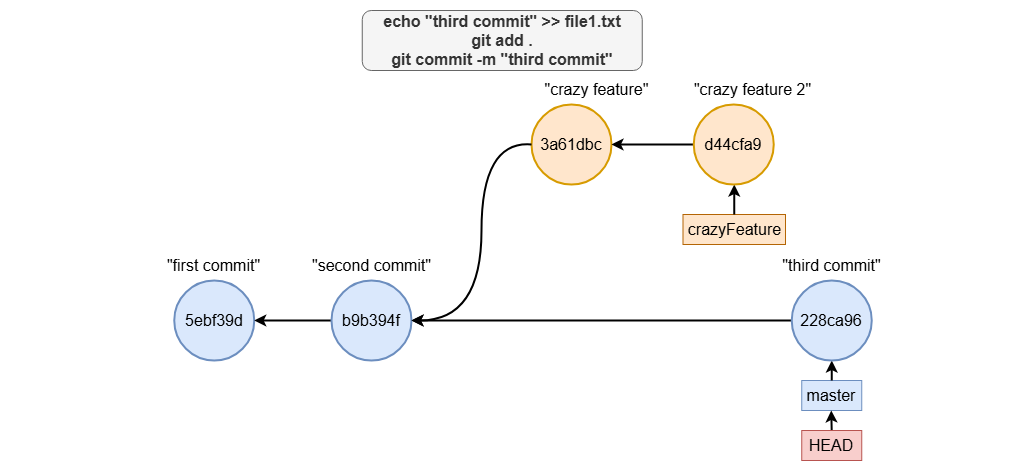
To reset the branch to a specific commit, use: And this is a visualization of what happens:
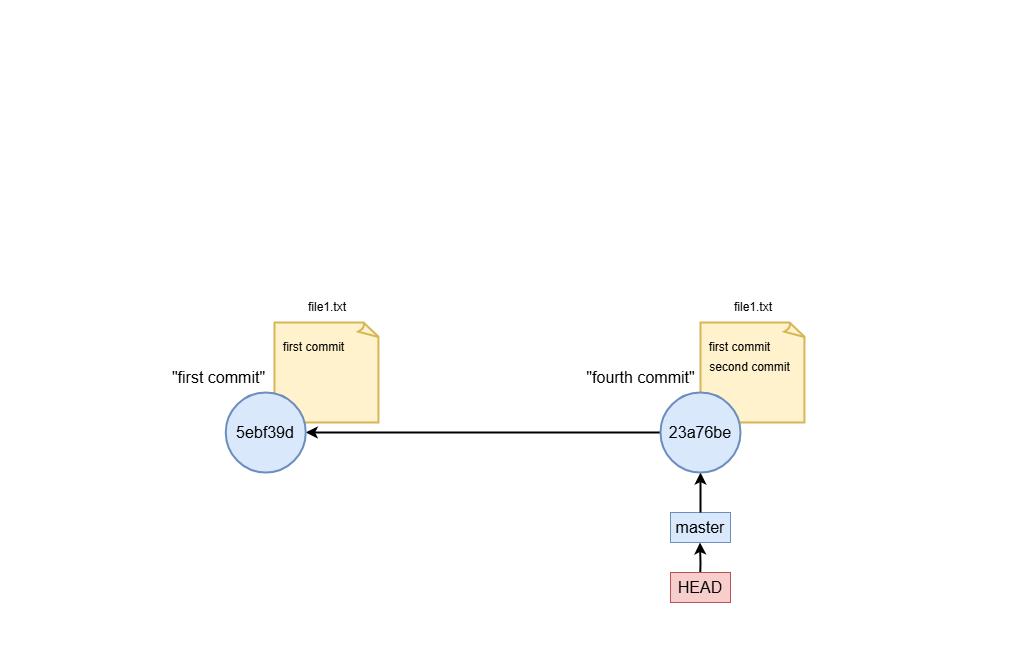
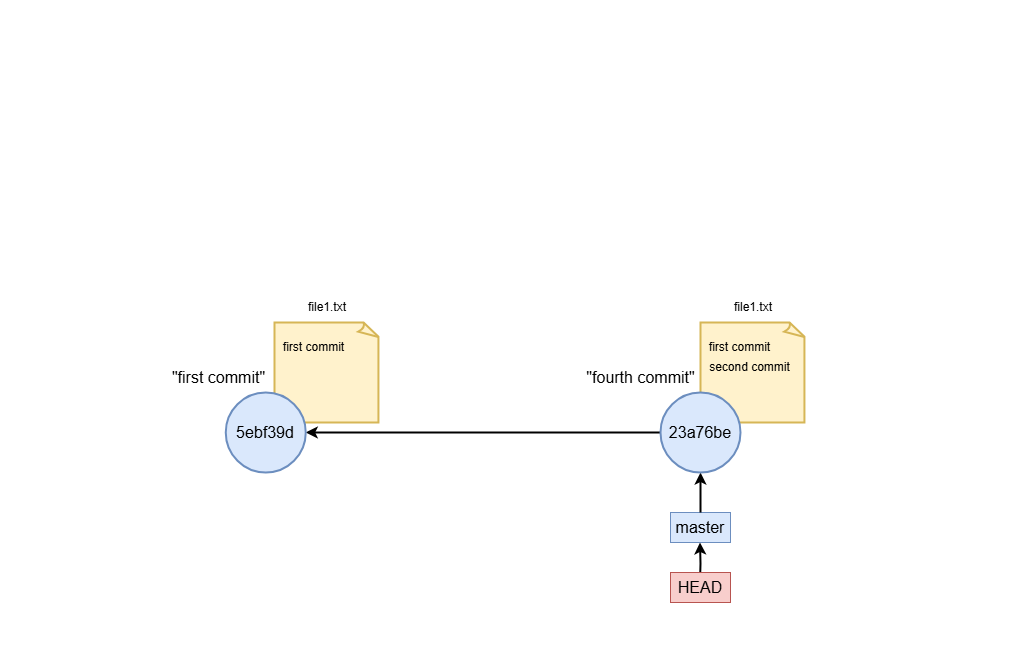
The git reset command has three primary modes to control what happens to your working directory and staging area. A hard reset ( Use case: If you made a bunch of changes to the repo (not yet staged), but wan to revert to initial state, you can do. Note that any untracked file will still be kept (git does not know about untracked files). To also remove untracked files (which you can view running Use A mixed reset ( Use case: If you want to split last commit into multiple commits, you can do This will keep your file in the working area and now you can stage only the one you want and make more than one commit. A soft reset ( If you want to revert changes in a single file rather than resetting the entire branch, you can use: Here, This diagram highlights how each mode affects the branch tip, staging area, and working directory.
Using git reset effectively can help you rewrite history, clean up your work, and undo mistakes with precision.git reset - move branch reference around
Moving the branch tip
git reset 7ffe2cf
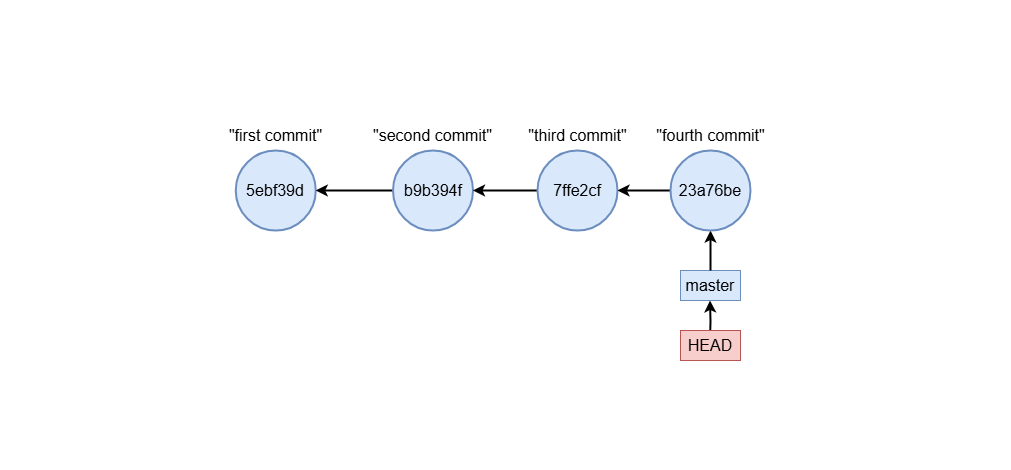
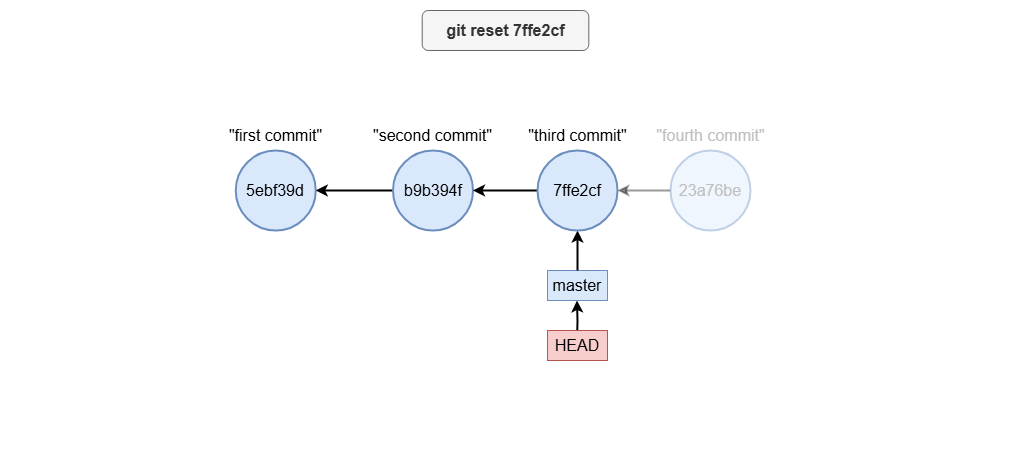
Git reset options
--hard) changes the branch tip, staging area, and working directory to match the specified commit.
All uncommitted changes are lost.
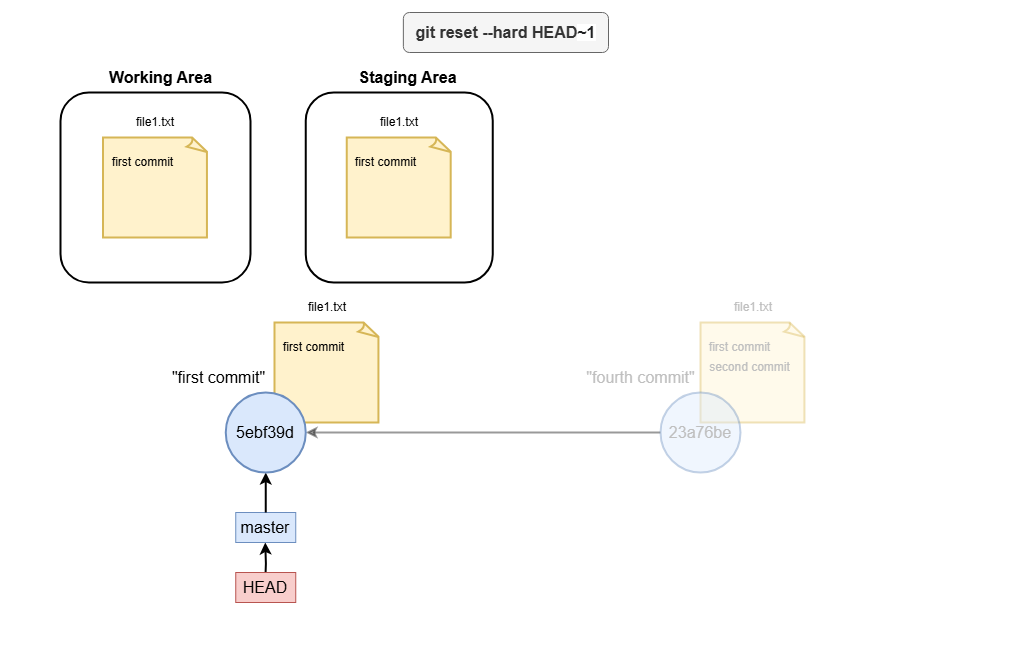
git reset --hard HEAD
git status) you can use the git clean command.git clean -d to also recurse into directorys, or git clean -i for an interactive mode.
In any way, git clean is just a “fancy” bash rm.
--mixed) changes the branch tip and un-stages changes, but your working directory remains untouched.
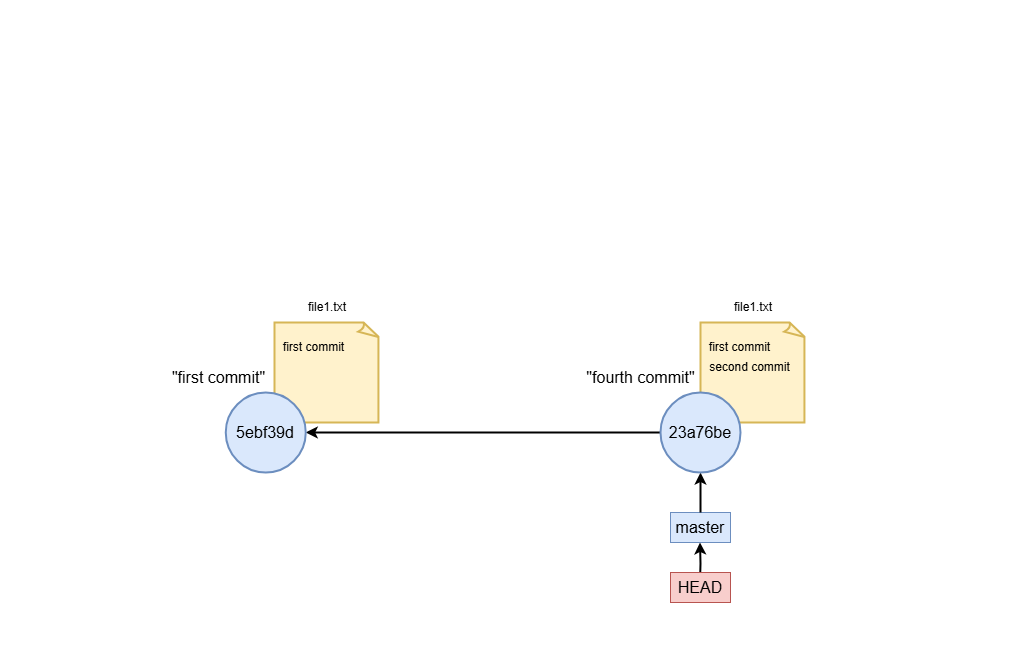
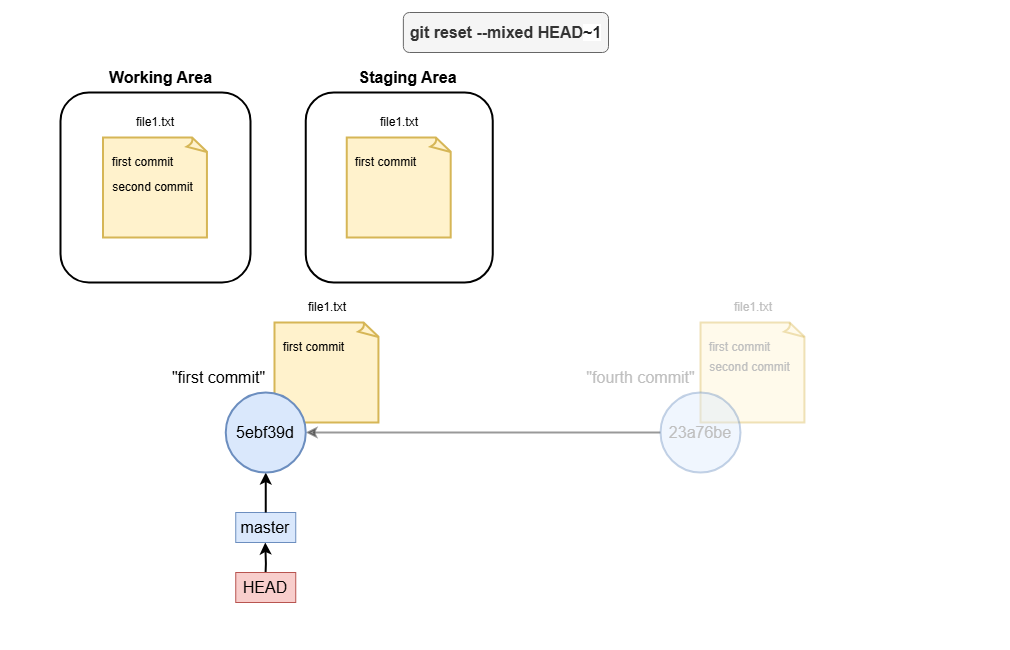
git reset --mixed HEAD~
--soft) moves the branch tip but leaves both your working directory and staging area unchanged.
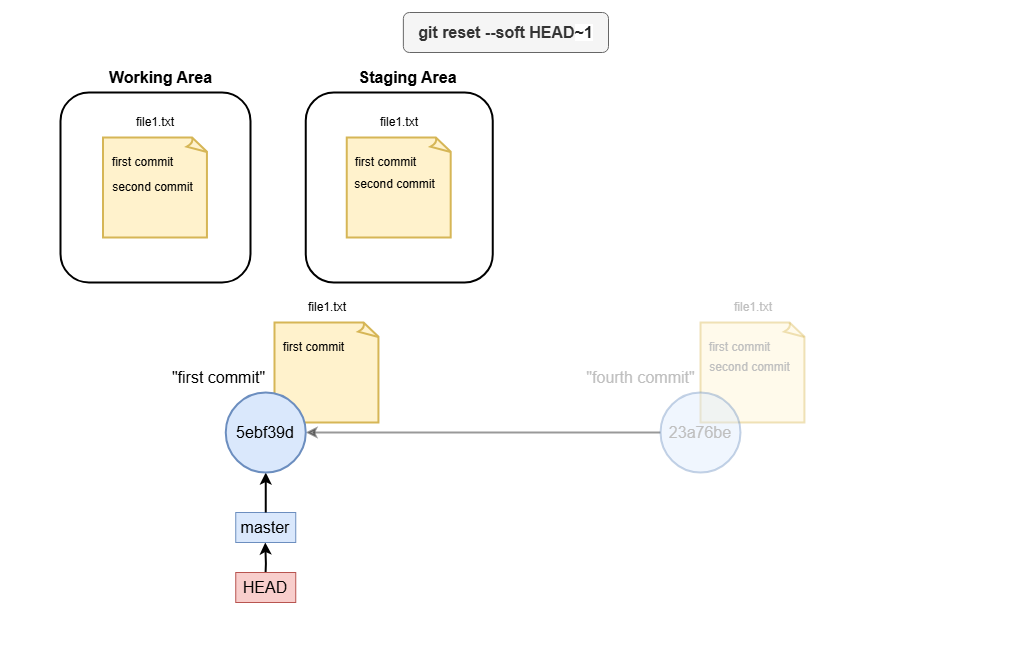
Resetting individual files
git reset -- file.txt
-- tells Git not to interpret subsequent arguments as commands.Diagram for git reset
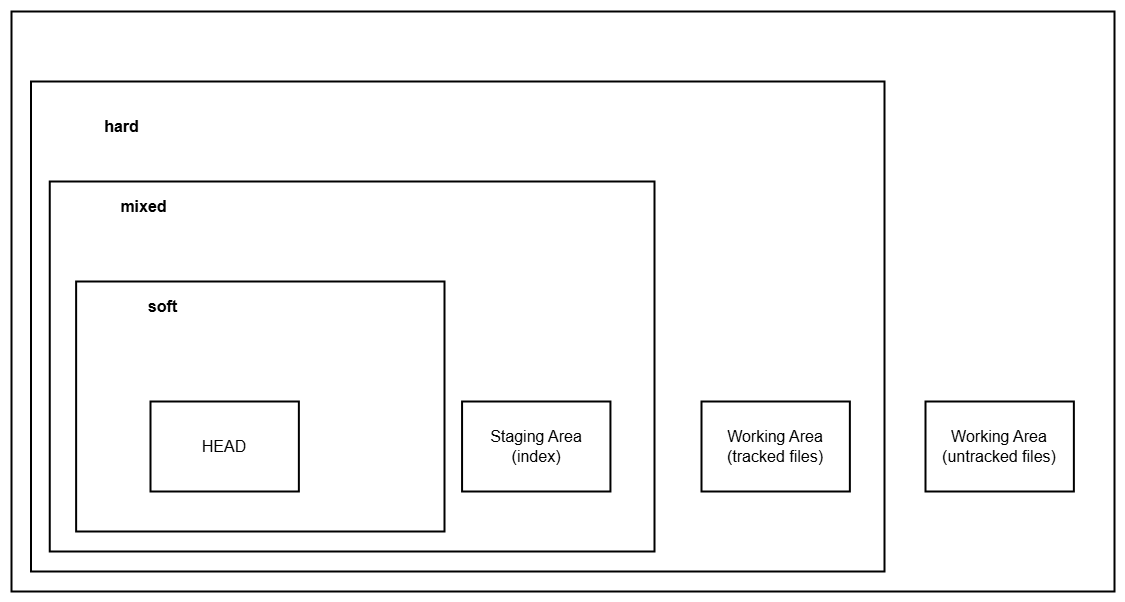
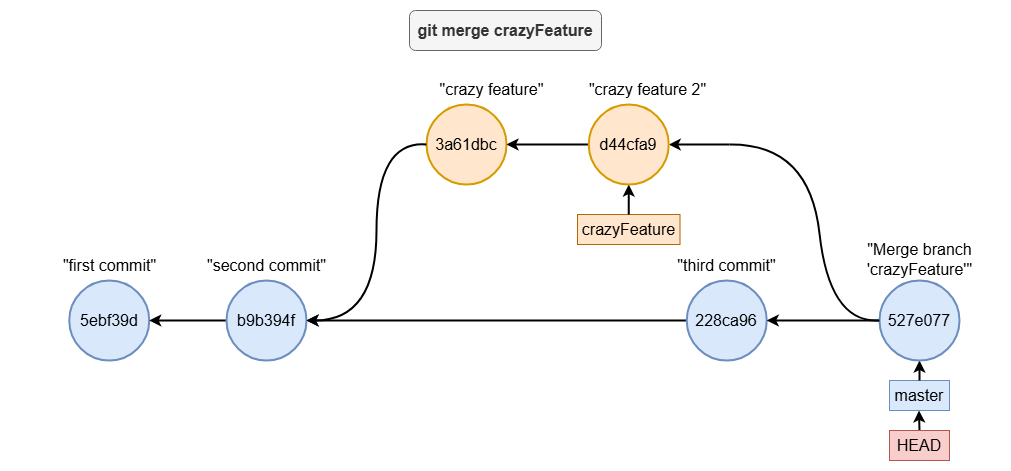
For example, to merge the crazyFeature branch into master, you can follow these steps: Visually, this is what happens:
Sometimes, Git may encounter conflicts during the merge process if changes in the two branches overlap.
In such cases, Git will pause the merge and mark the conflicting areas in your files. Here’s an example of what a conflict might look like in file.txt: The «««< HEAD section shows the content from the current branch (master), while the ======= and »»»> crazyFeature sections show the conflicting changes from the branch being merged (crazyFeature). To resolve the conflict, you can manually edit the file to decide which changes to keep, discard, or combine. For example, you might resolve the conflict like this: After resolving the conflict, you need to stage the file and complete the merge: This creates a new merge commit that records the resolution and finalizes the merge process.git merge
Merging Two Branches
git checkout master # Ensure you are on the branch to receive the changes
git merge crazyFeature
Handling Merge Conflicts
first commit
second commit
<<<<<<< HEAD
third commit
=======
crazy feature
crazy feature 2
>>>>>>> crazyFeature
Resolving the Conflict
first commit
second commit
third commit
crazy feature
crazy feature 2
git add .
git commit
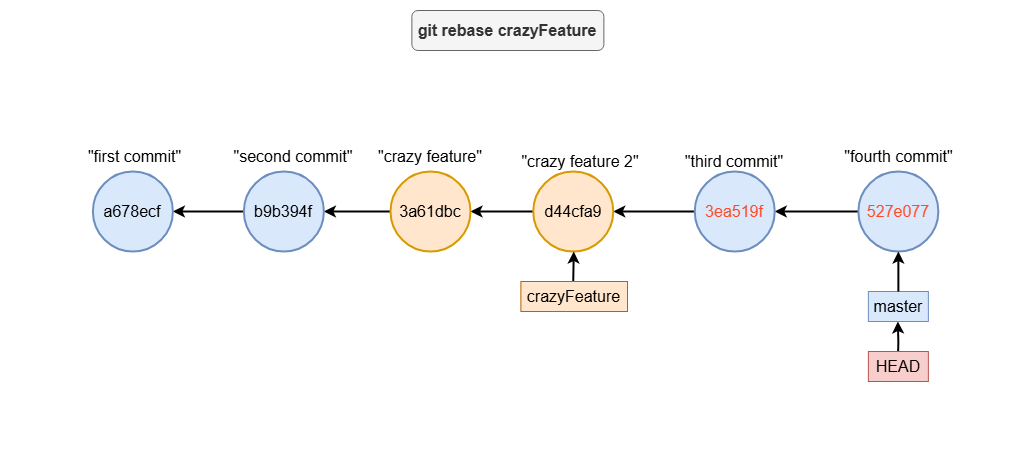
When you rebase, Git reapplies commits from the current branch onto the target branch, one by one, as if they were made on top of it. Let’s say you have two branches: master and crazyFeature.
If you’ve made commits on crazyFeature and want to integrate those changes into master but avoid a merge commit, you can rebase:rebase
How Rebase Works
git checkout master
git rebase crazyFeature

Key Points to Remember
git rebase --continue
git rebase --abort
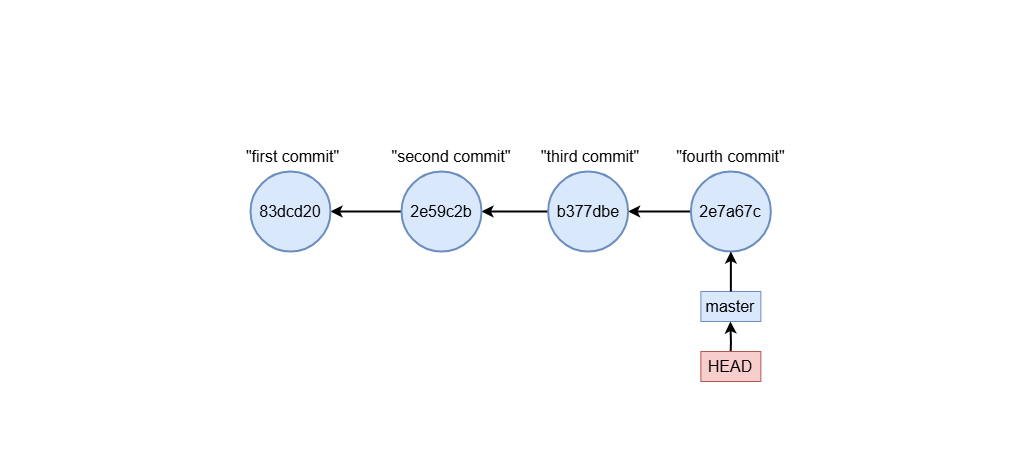
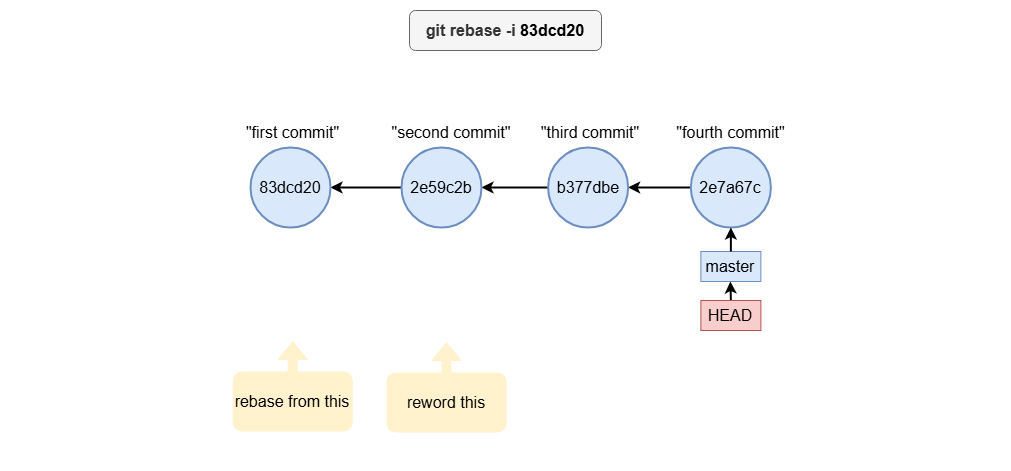
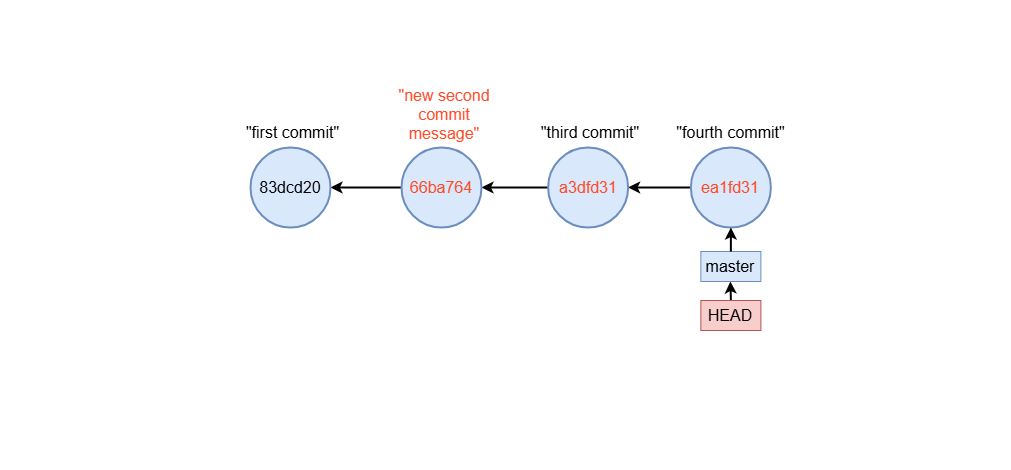
To begin an interactive rebase, specify the number of commits to include, or a base commit to rebase onto: This opens an editor displaying the commits in reverse chronological order: Each commit line starts with an action (pick) and is followed by the commit hash and message. To edit a commit message, change pick to reword: When you save and exit, Git will prompt you to enter a new message for the specified commit. Squashing combines multiple commits into one.
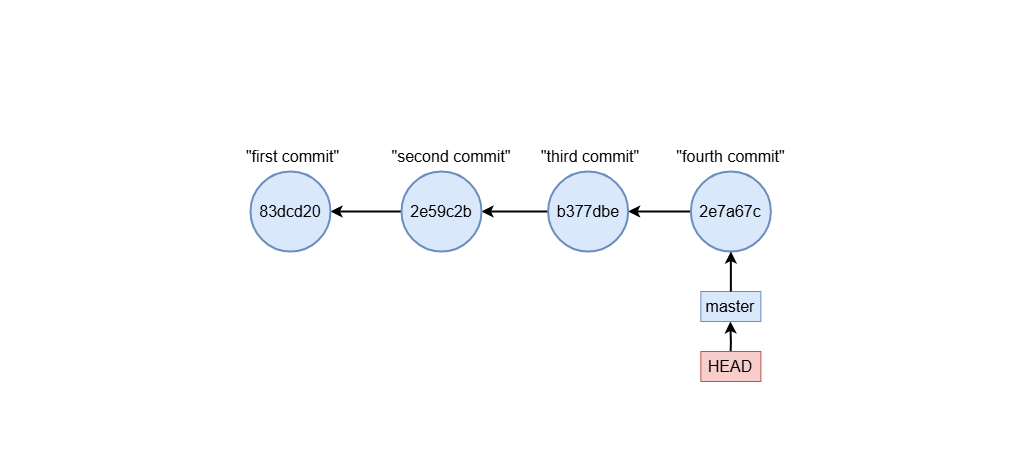
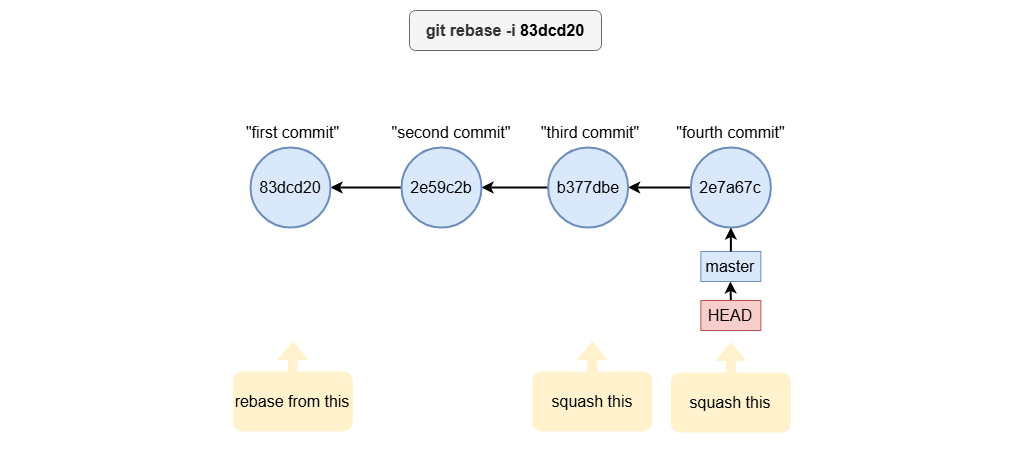
To squash a commit, replace pick with squash (or s) for the commits you want to merge: When you save, Git opens another editor to let you combine the commit messages.rebase interactive
Starting an Interactive Rebase
git rebase -i HEAD~3
pick 123abc Commit message 1
pick 456def Commit message 2
pick 789ghi Commit message 3
Actions in Interactive Rebase
Reword example
git rebase -i 83dcd20
reword 2e59c3b second commit
pick b377dbe third commit
pick 2e7a67c fourth commit
Squash example
pick 2e59c3b second commit
squash b377dbe third commit
squash 2e7a67c fourth commit
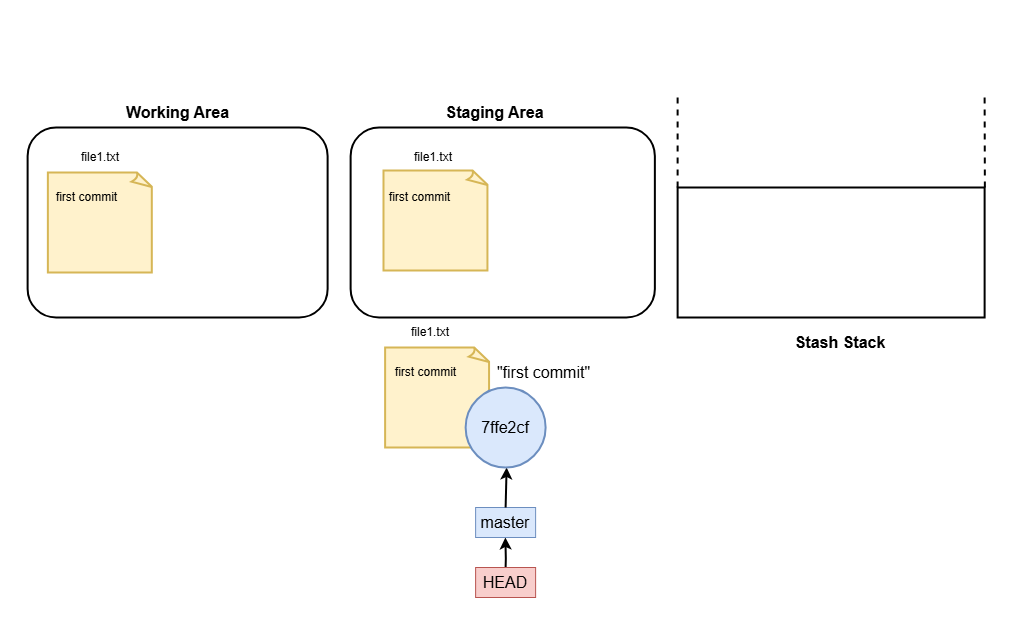
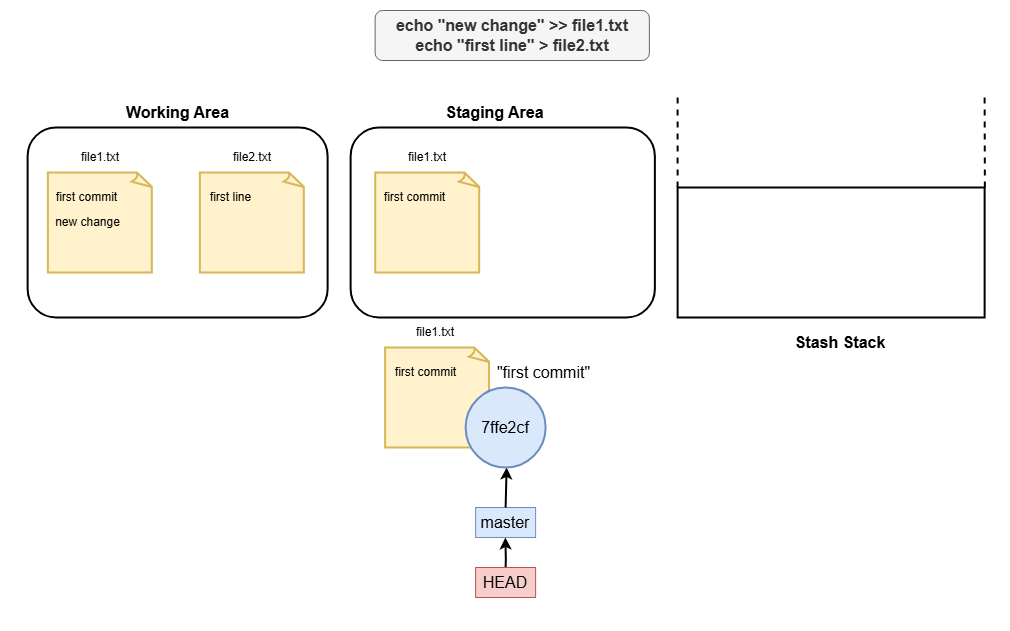
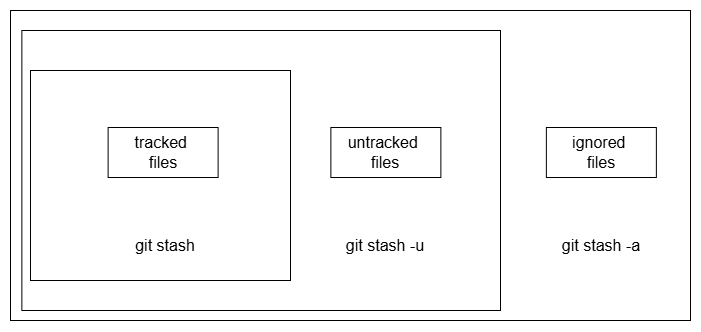
When you run: Git saves the changes in your working directory (tracked) and staging area to a “stash stack.”
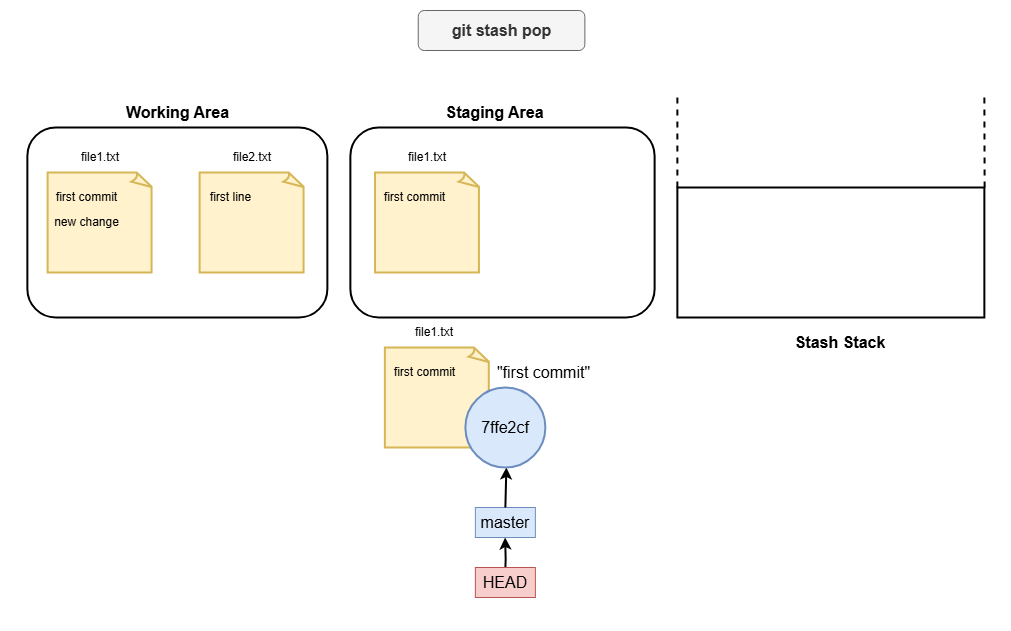
This clears your working directory, allowing you to start fresh or switch branches without interference. To retrieve your changes later, you use: This restores the stashed changes and removes them from the stash stack.stash
How Git Stash Works
git stash
git stash pop

Additional Stash Commands
git stash list
git stash apply
git stash clear
git stash -u
Working with Git remotely
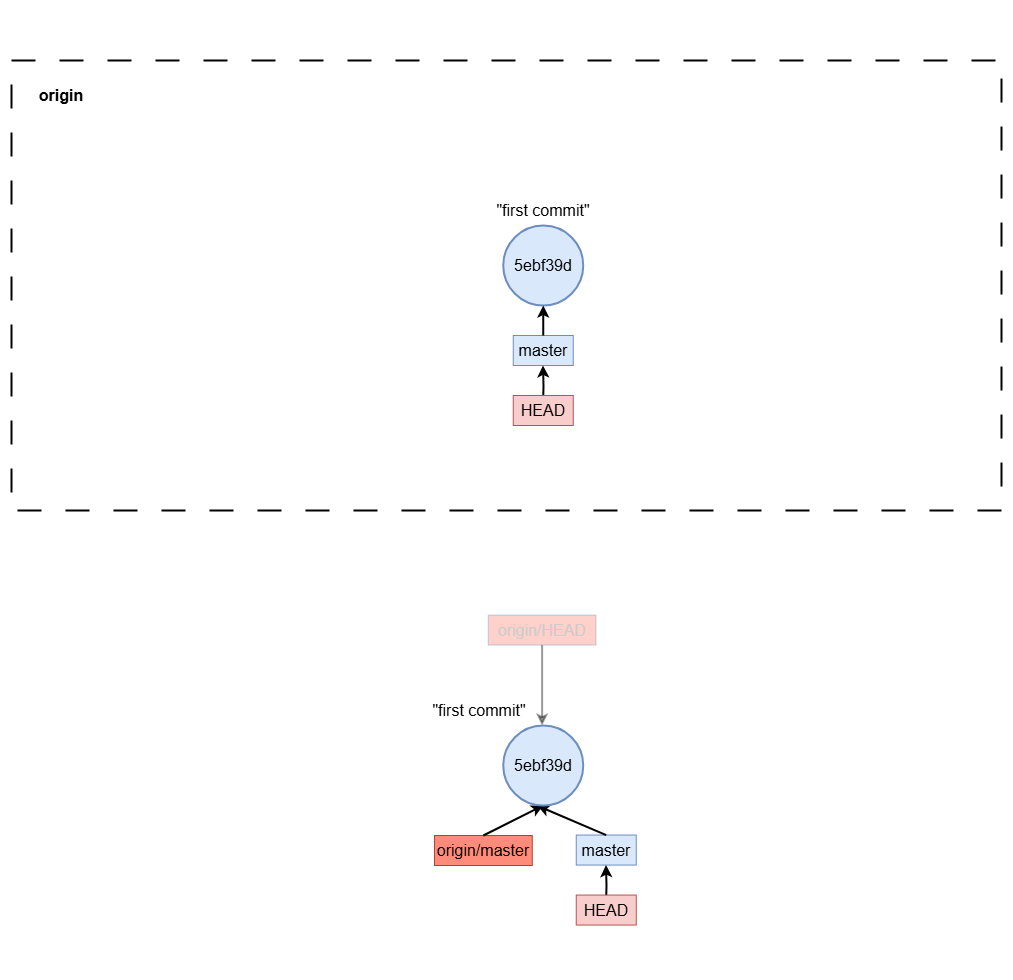
The first step is to save your changes to the local repository with git commit.
For example: This records the changes in your local repository.
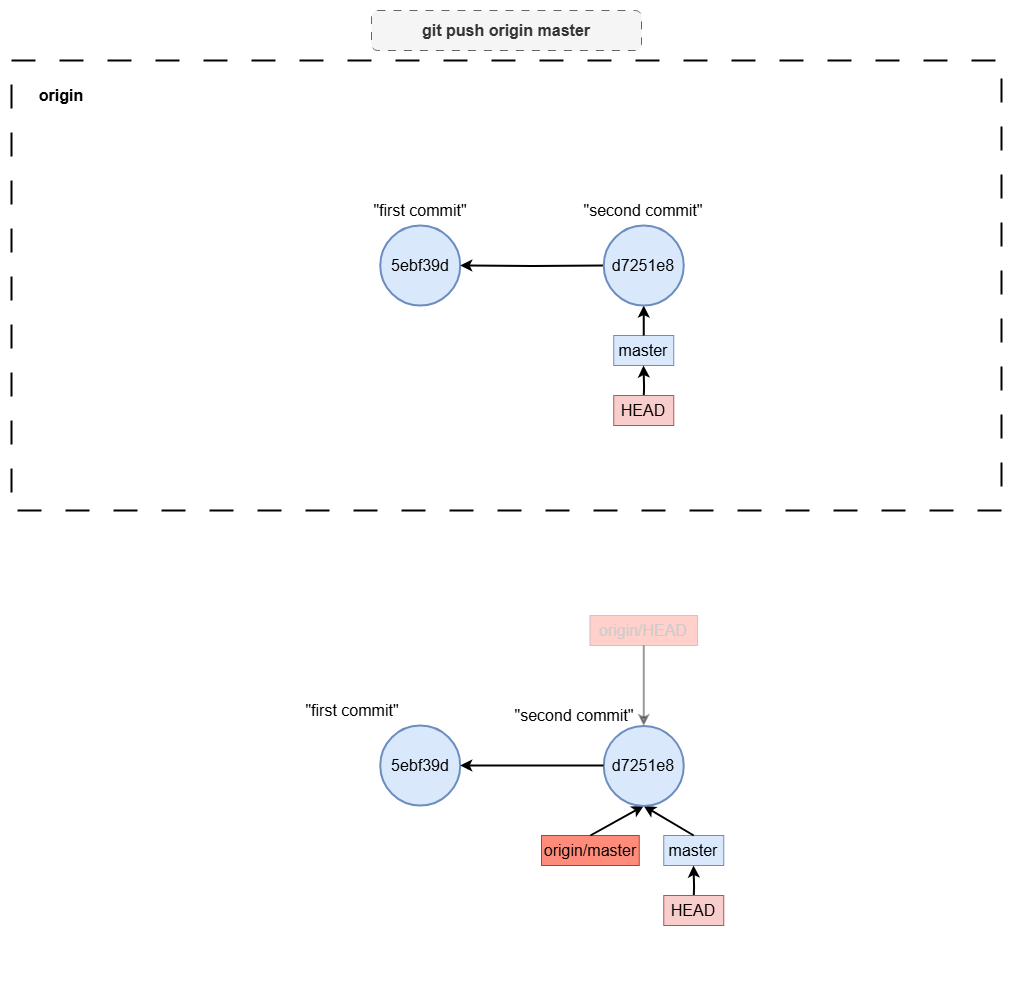
At this stage, the changes are not yet shared with others or pushed to the remote repository. To share your changes, you push them to a remote repository, such as origin, typically on a platform like GitHub or GitLab. This command sends the commits from your local master branch to the master branch in the remote repository called origin. When you push to origin master, Git:commit & push
Committing Changes Locally
git add .
git commit -m "second commit"
Pushing to a Remote Repository
git push origin master
Visualizing the Push Process

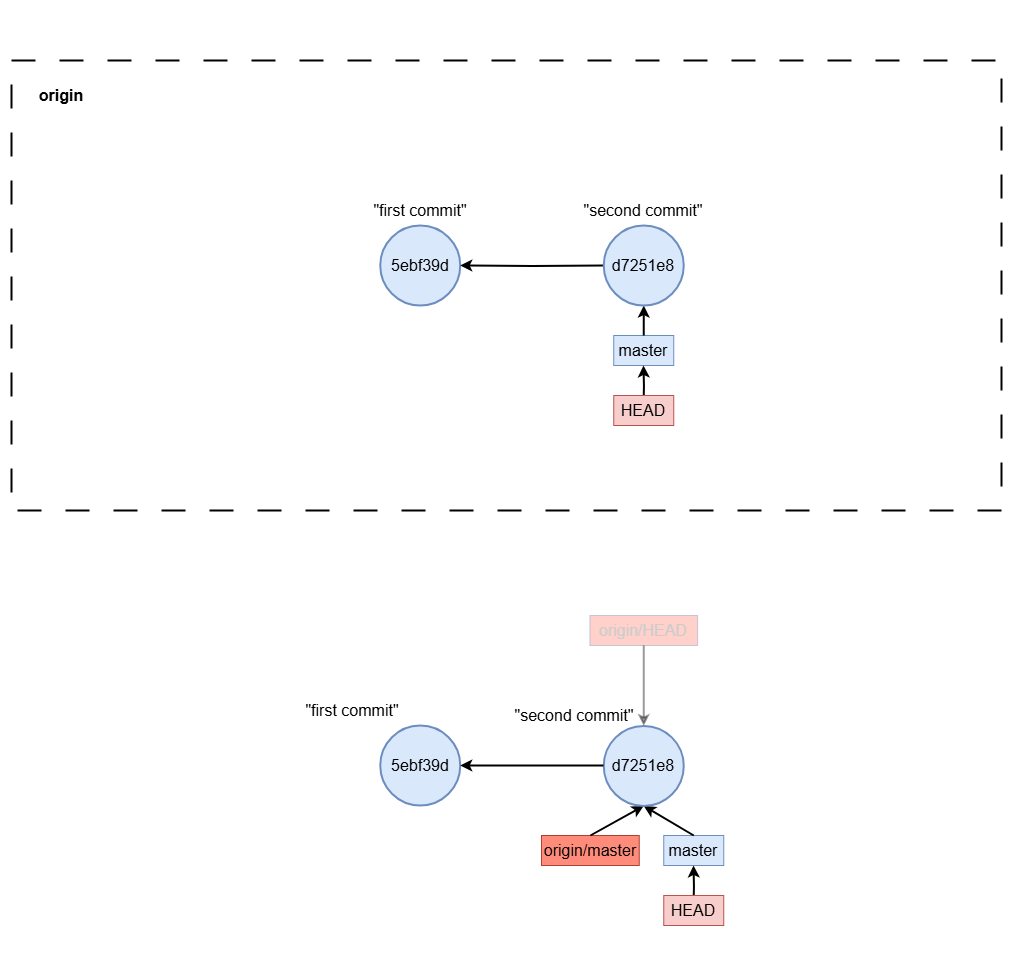
To share a branch with others, you can push it to the remote repository using: This command creates a new branch in the remote repository (if it doesn’t already exist) and pushes the commits from your local crazyFeature branch to the remote crazyFeature branch. To delete a local branch reference, you can do To do the same thing but for a remote repository, you can doworking with branches
Pushing a Local Branch to the Remote
git push origin crazyFeature
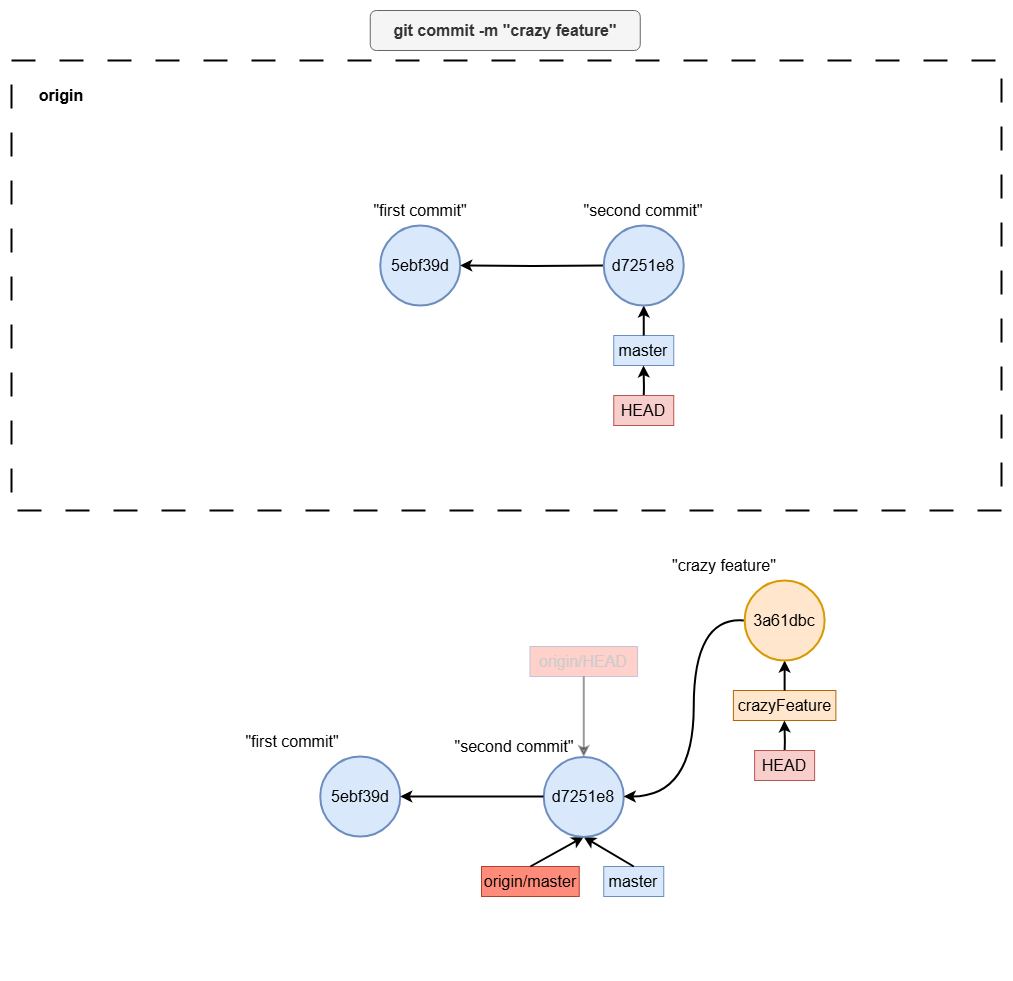
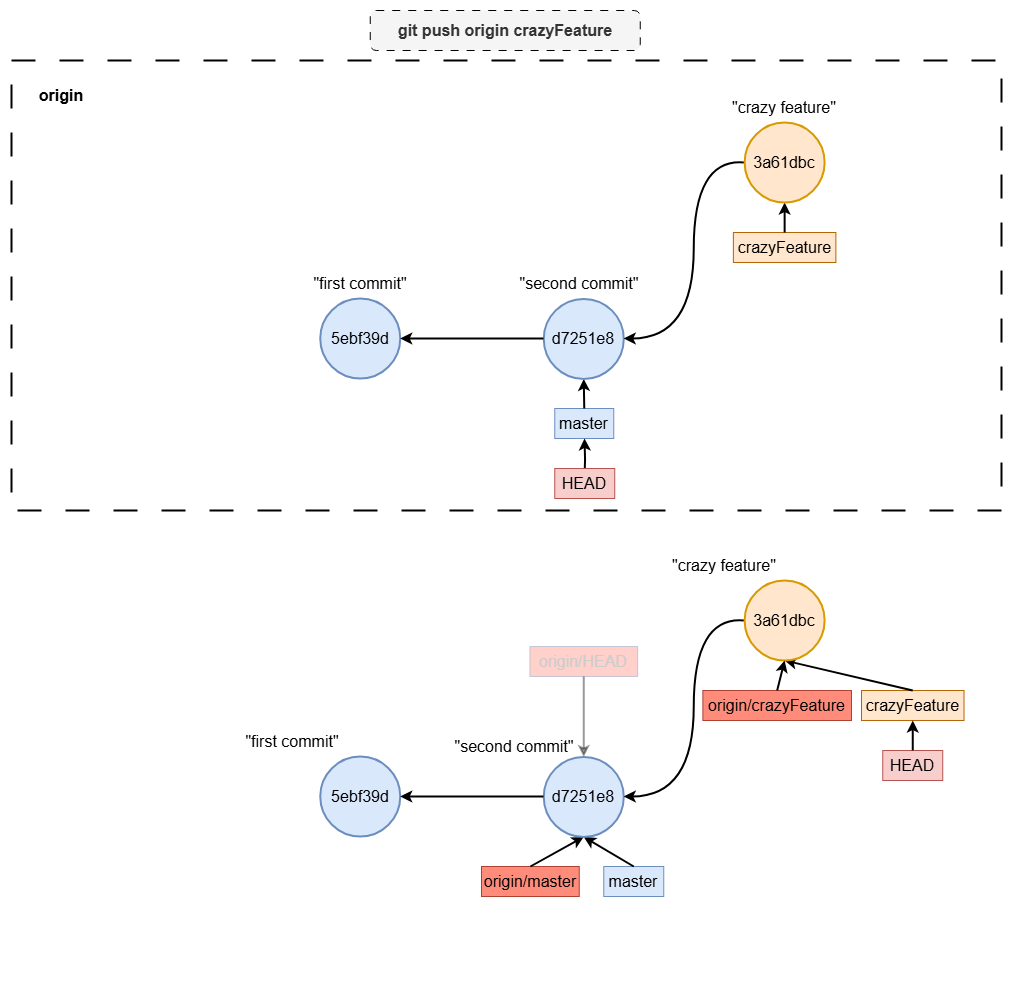
Deleting a branch
git push branch -d crazyFeature
git push -d origin crazyFeature
After resolving any conflicts and completing the merge locally, your local branch will contain the updated history. Once the local merge is complete, you need to push the changes to the remote branch: This updates the remote master branch with the result of your local merge, making it available to others.
merging
Merging Locally
git checkout master
git merge crazyFeature
Pushing the Merge to the Remote
git push origin master
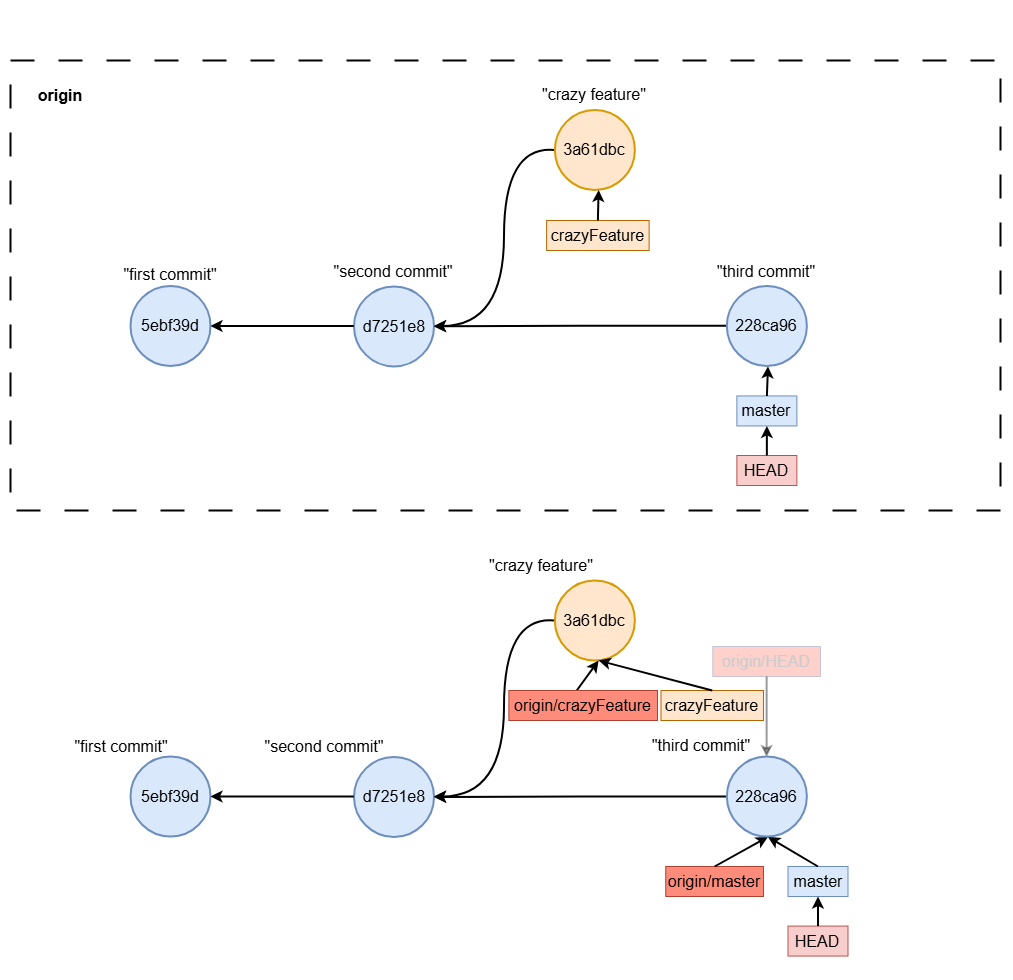
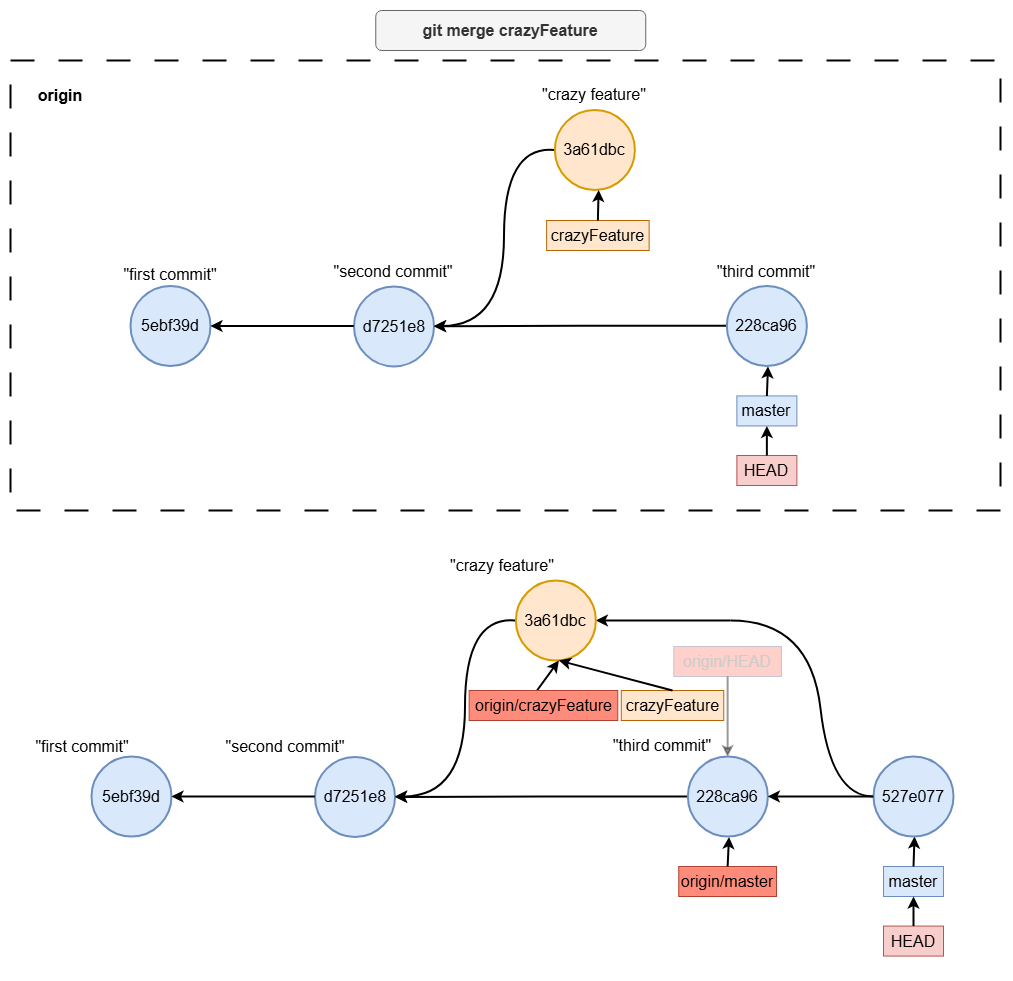
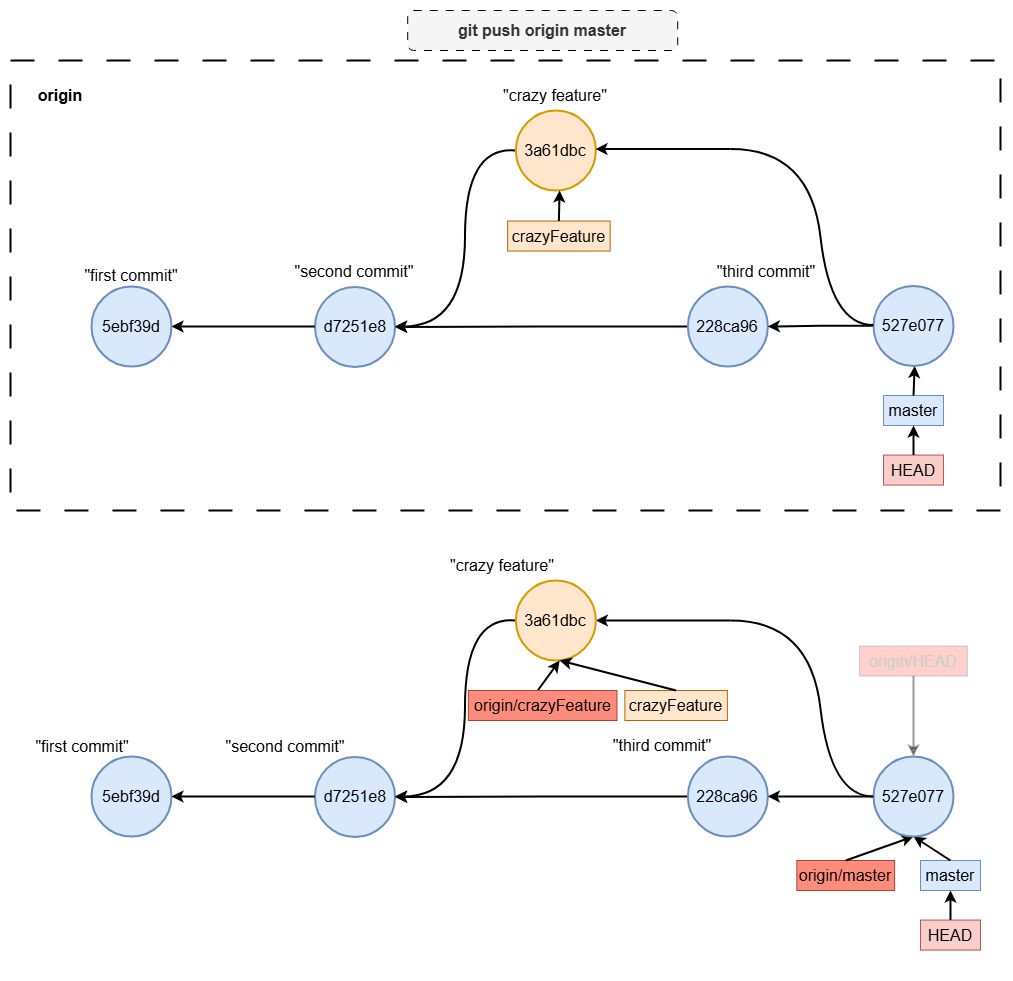
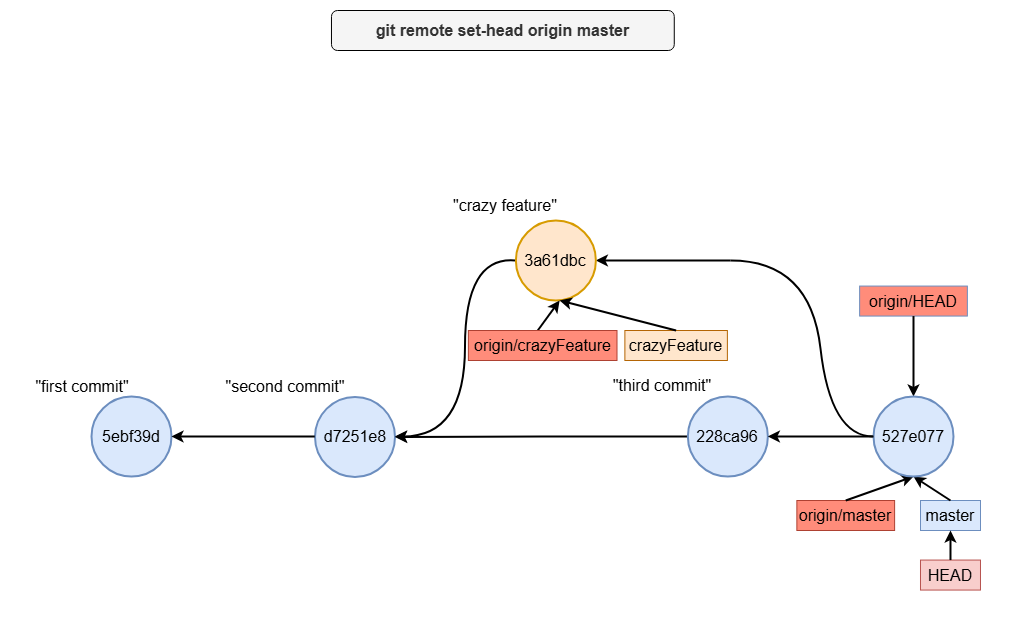
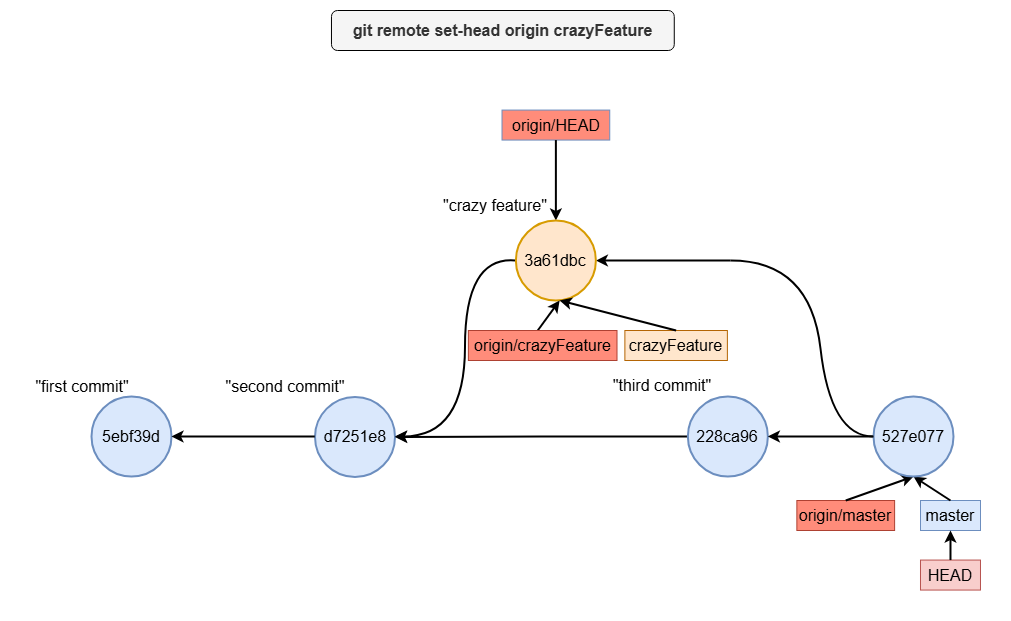
By default, origin/HEAD points to the branch initially designated as the default branch in the remote repository. However, you can update this pointer using the git remote set-head command. For example, if you want origin/HEAD to point to the crazyFeature branch, you can run: This makes the workflow seamless when you push changes: Git automatically knows to push to origin/crazyFeature without requiring you to specify the branch explicitly.
what is origin/HEAD
Setting origin/HEAD
git remote set-head origin crazyFeature
git push
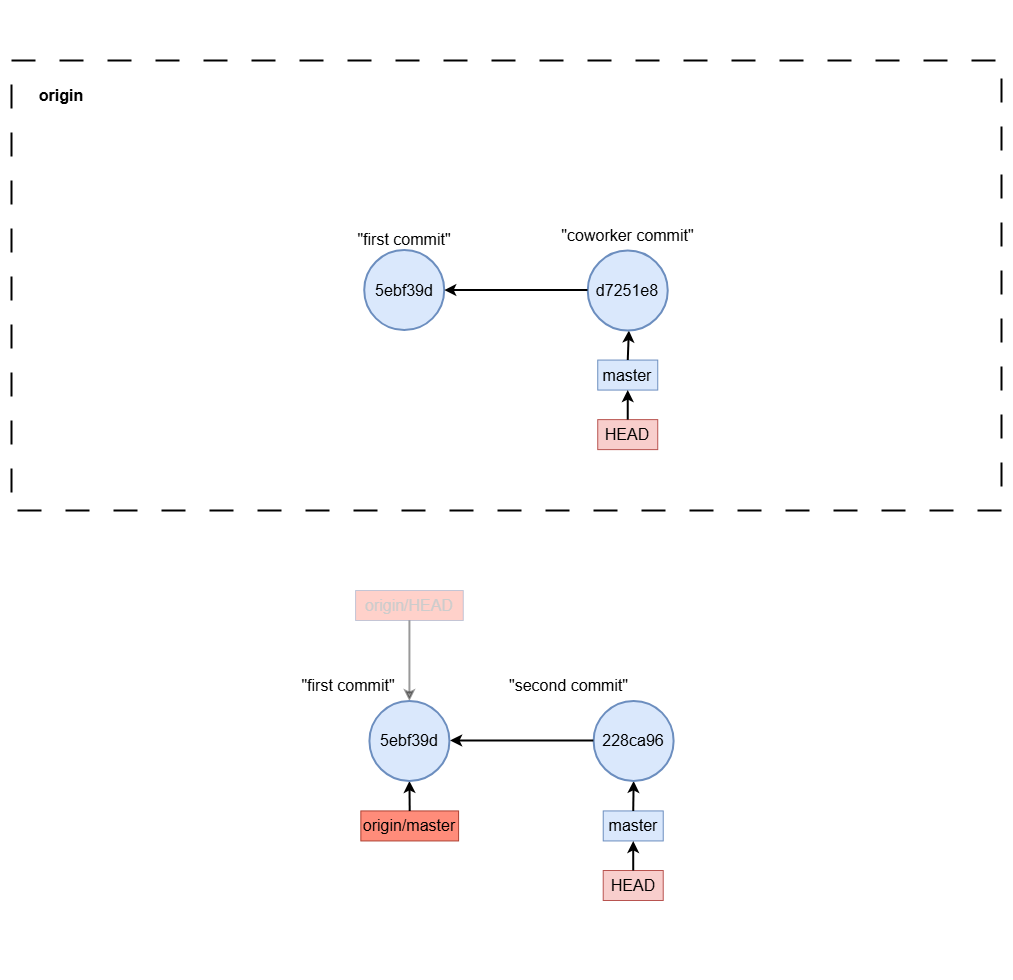
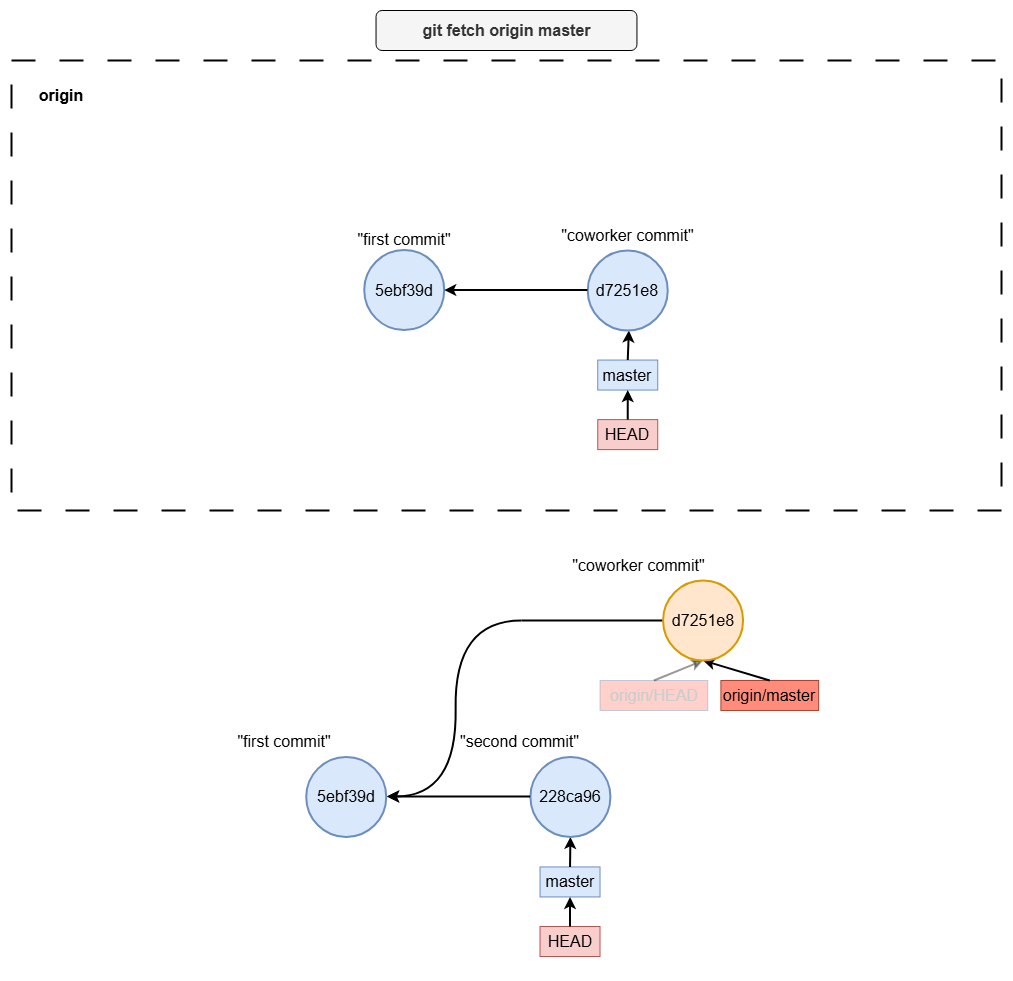
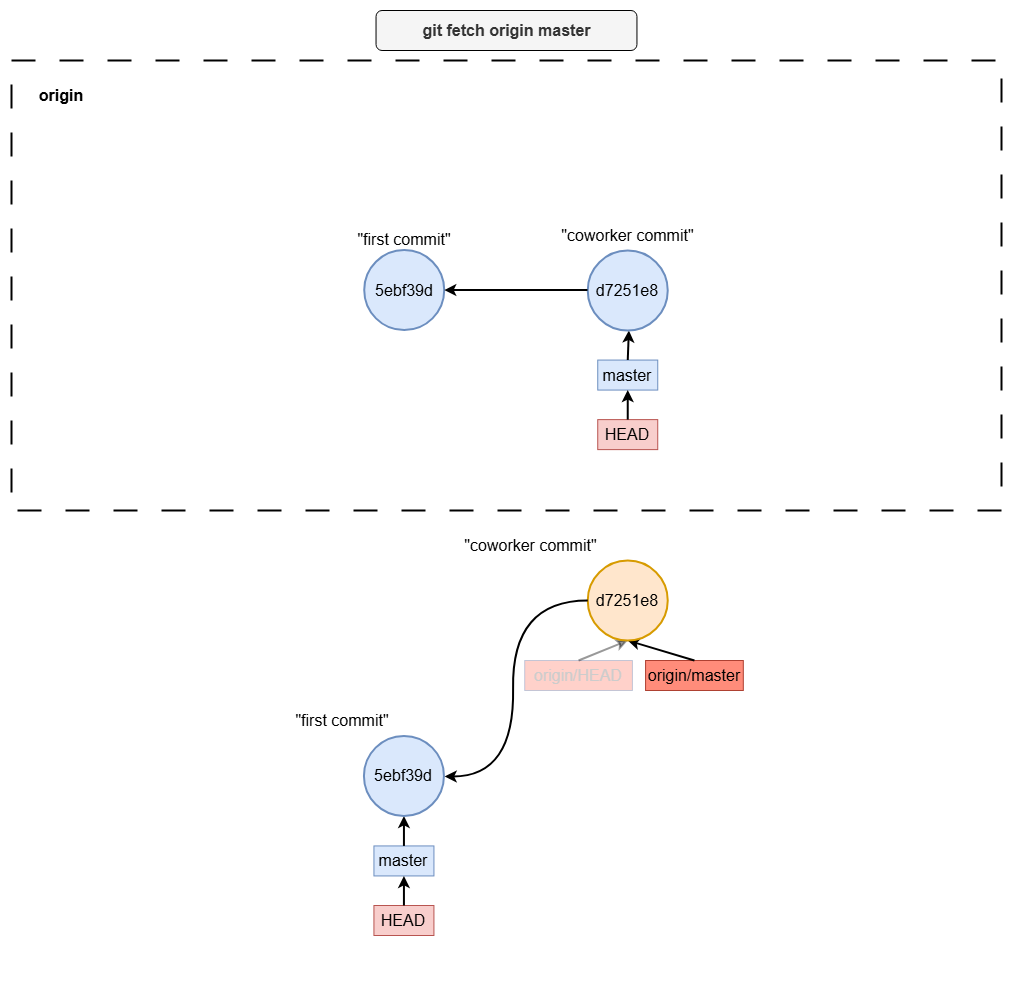
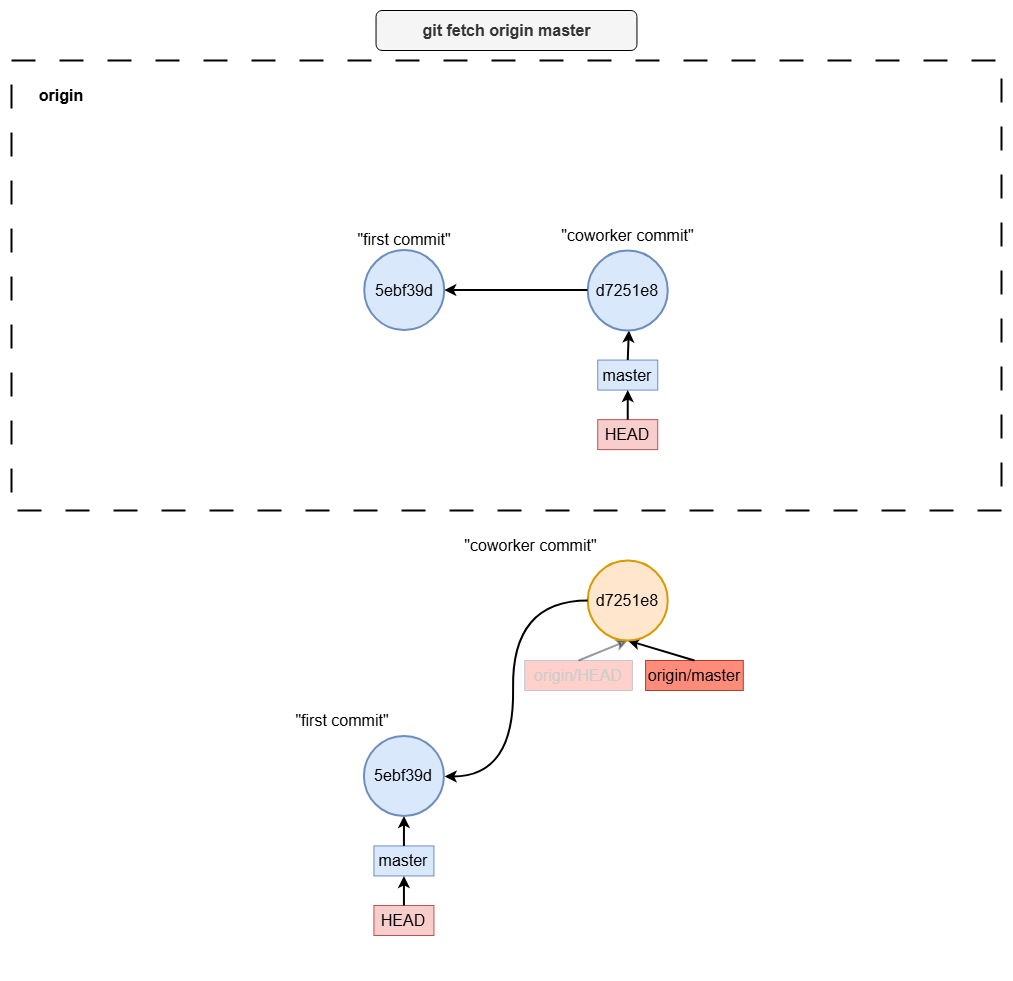
git fetch
git fetch origin master
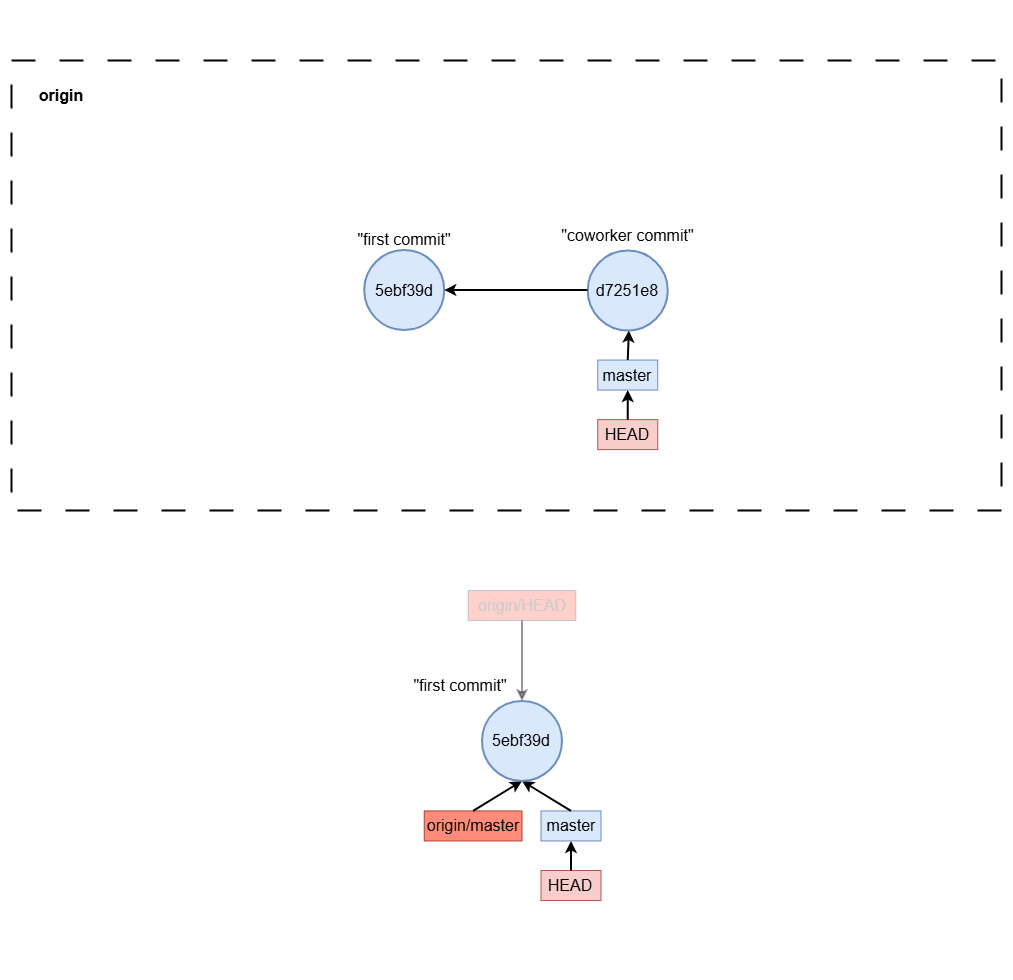
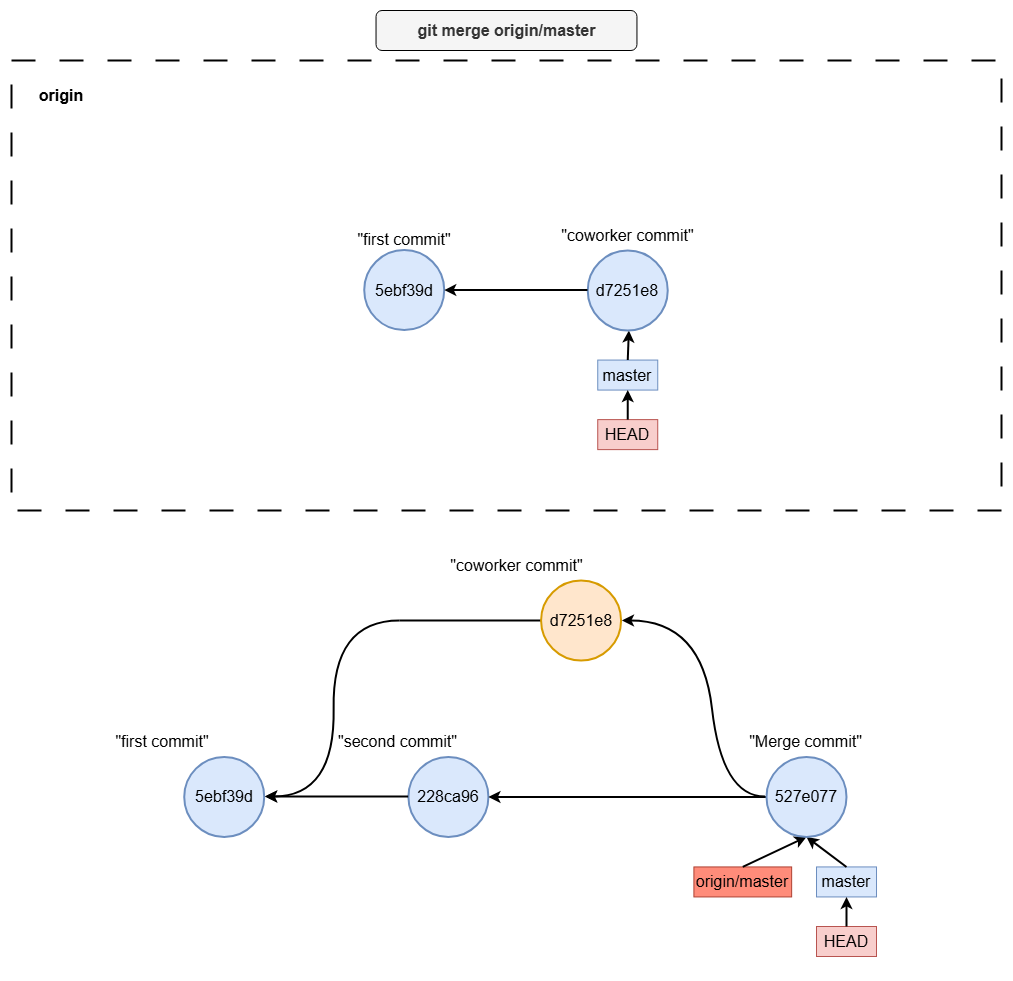
git pull
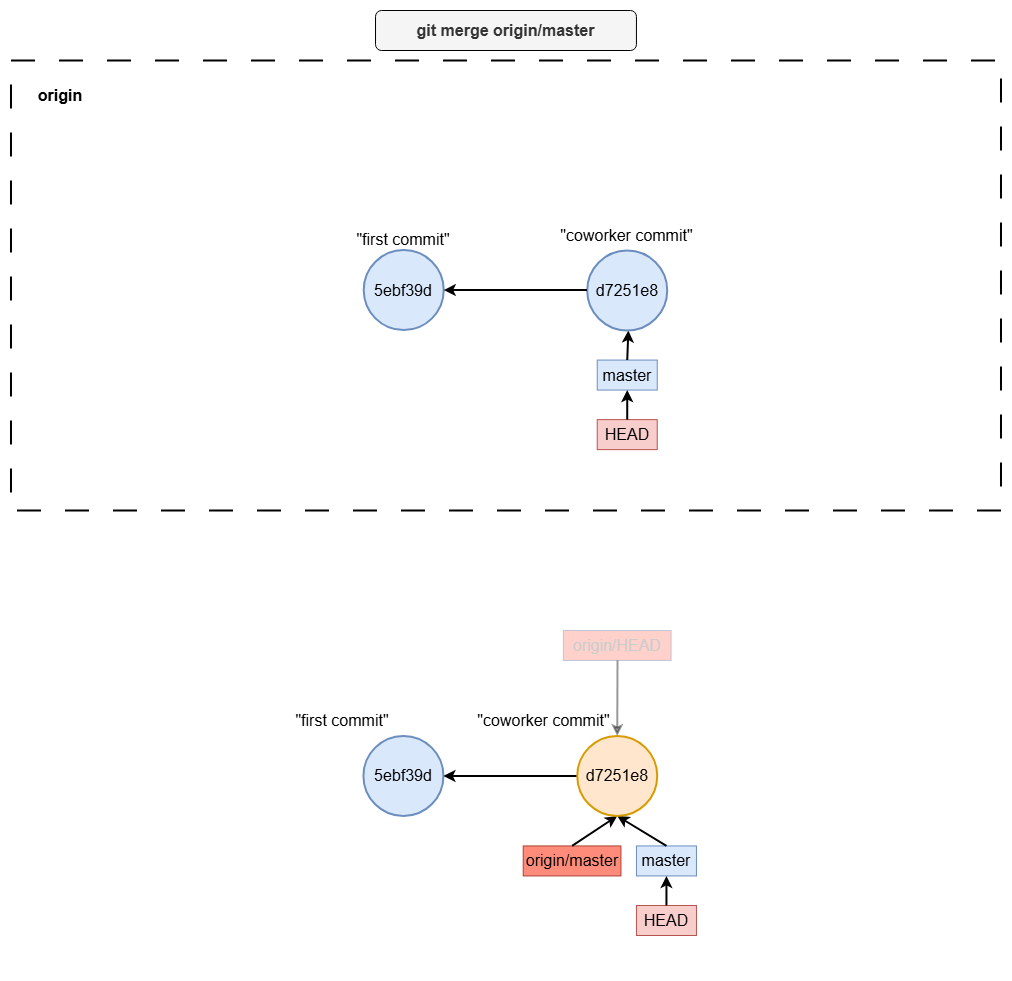
git fetchgit merge origin/<branch-name>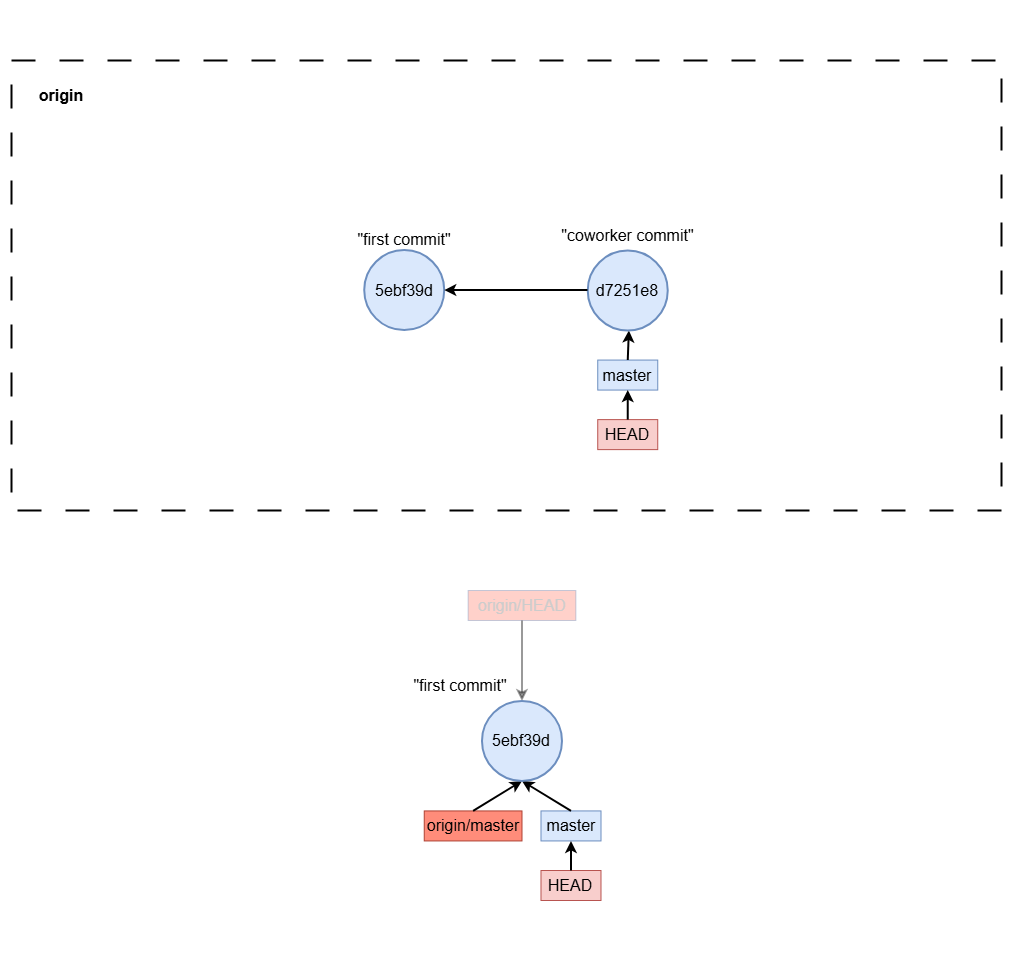
git pull common mistake